

Table of contents
Before we delve into the various tools that can be used daily to boost your productivity with Kubernetes, let's take a step back in time and understand how the concept of Kubernetes emerged.
In the 1990s, a single server was used to deploy one application. Let's say you created an e-commerce application. Naturally, you would want the world to use your application, right? The simplest thing you could do is deploy that application on a server. A server is a computer or program that provides resources or services to other computers or programs on a network. Servers were quite expensive back then and remain costly today. With the deployment of only one application on one server, a significant amount of memory was wasted. If you created another application, you would need a new server to deploy it, configure the server with a seemingly endless list of required dependencies, and so on.
Who solved this problem?
VMware did.
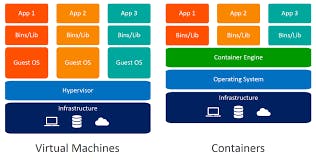
VMware revolutionized computing by introducing virtualization, which allowed multiple virtual machines with their own operating systems to run on a single physical server, increasing hardware utilization and reducing costs. However, there was still some waste of memory for a server that could have been utilized.
Now, came into the picture, Containers.
Containers are lightweight, self-contained environments that package applications with their dependencies and configuration files, using operating system-level virtualization to efficiently share resources and run consistently across various computing environments without a full OS, offering a faster alternative to virtual machines.
One of the major benefits of using a container is that it encompasses all the necessary dependencies for your application to be built, which you define declaratively in a Dockerfile. As a result, you no longer need to worry about a lengthy process of installing dependencies and other prerequisites to run your application, as containers efficiently handle these tasks.
For scalability, you can scale your containers using tools like Docker. However, with the use of tools like Docker, scalability can be achieved only up to a certain limit.
Let's assume your application is running inside a container. Imagine the container crashes suddenly, or imagine you'd like to run 1000 containers of your application. What will you do then?
Enter one of the most popular and widely used tools: Kubernetes.
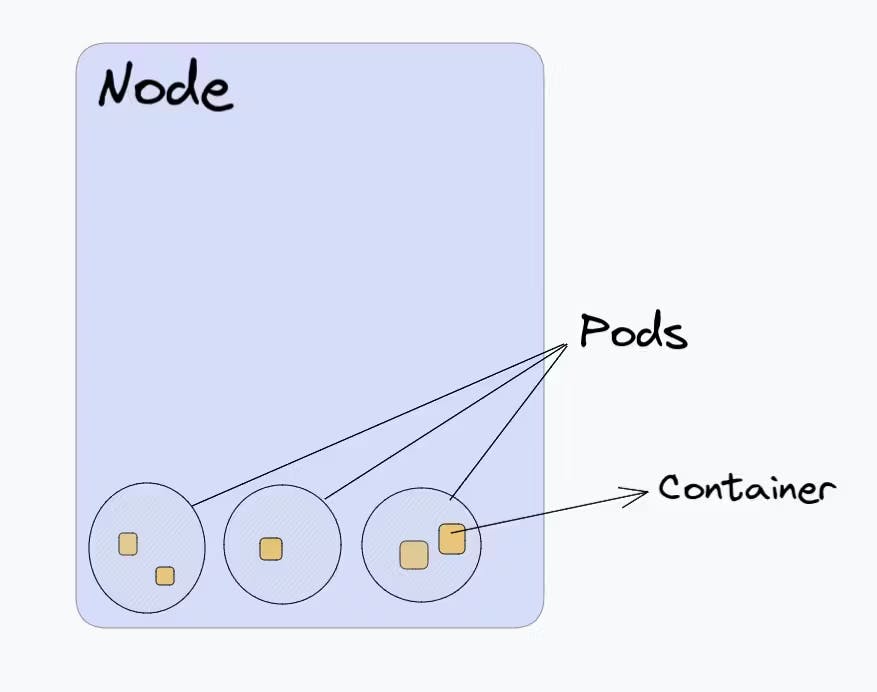
Kubernetes is an open-source container orchestration platform that automates the deployment, scaling, and management of containerized applications. Instead of directly running containers on top of a virtual machine, the container will run inside a small unit called a Pod. The Pod will run inside a Node, which is a virtual machine where the Pod is running.
When working with Kubernetes, there are numerous tasks to manage, such as writing accurate manifest files (manifest files are the declarative files you write to instruct Kubernetes), validating YAML files, and more. These tedious tasks can be streamlined with the appropriate set of tools, but only if one knows which tool is used for what purpose. As a beginner, setting up your own Kubernetes cluster and managing various other aspects can be quite confusing as well.
In this blog, we will explore various sets of tools that you can consider depending on your needs. If you're interested in learning about tools for validating YAML files, setting up a local Kubernetes cluster other than Minikube, and more, you've come to the right place. Let's get started.
Lens: Kubernetes is a powerful tool for managing containerized applications, but it can be complex and difficult to manage through command-line tools alone, especially for beginners. The ideal way to interact with your Kubernetes cluster through the command line is by the use of
kubectlthe command. Kubernetes Lens provides a graphical user interface (GUI) that simplifies the management of Kubernetes resources and makes it easier for developers and operators to deploy, monitor, and manage their applications.Here are a few ways in which Kubernetes Lens can be useful for beginners:
Simplifies Kubernetes management: Kubernetes Lens provides a dashboard that displays all the resources in a Kubernetes cluster in an intuitive way, making it easier for beginners to understand and manage the cluster. The dashboard shows resource utilization, logs, and other useful information, enabling developers and operators to monitor the health of their applications and infrastructure.
Helps with YAML editing: Kubernetes Lens includes an integrated YAML editor that makes it easy to create and modify Kubernetes manifest files. Beginners can use this editor to create new resources or modify existing ones, without having to memorize the syntax of YAML files.
Provides real-time metrics and logs: Kubernetes Lens provides real-time metrics and logs for Kubernetes resources, enabling beginners to monitor the health and performance of their applications and infrastructure. This information is presented in an easy-to-understand format, making it easier for beginners to troubleshoot issues and optimize their applications.
Helps with troubleshooting: Kubernetes Lens includes a built-in terminal that allows developers and operators to run commands and troubleshoot issues directly from the GUI. This makes it easier for beginners to identify and resolve issues without having to switch between different tools.
Having said this, Kubernetes Lens IDE simplifies Kubernetes management, reduces the learning curve for beginners, and provides real-time metrics and logs for cluster resources, making it an essential tool for anyone looking to streamline their Kubernetes workflows.
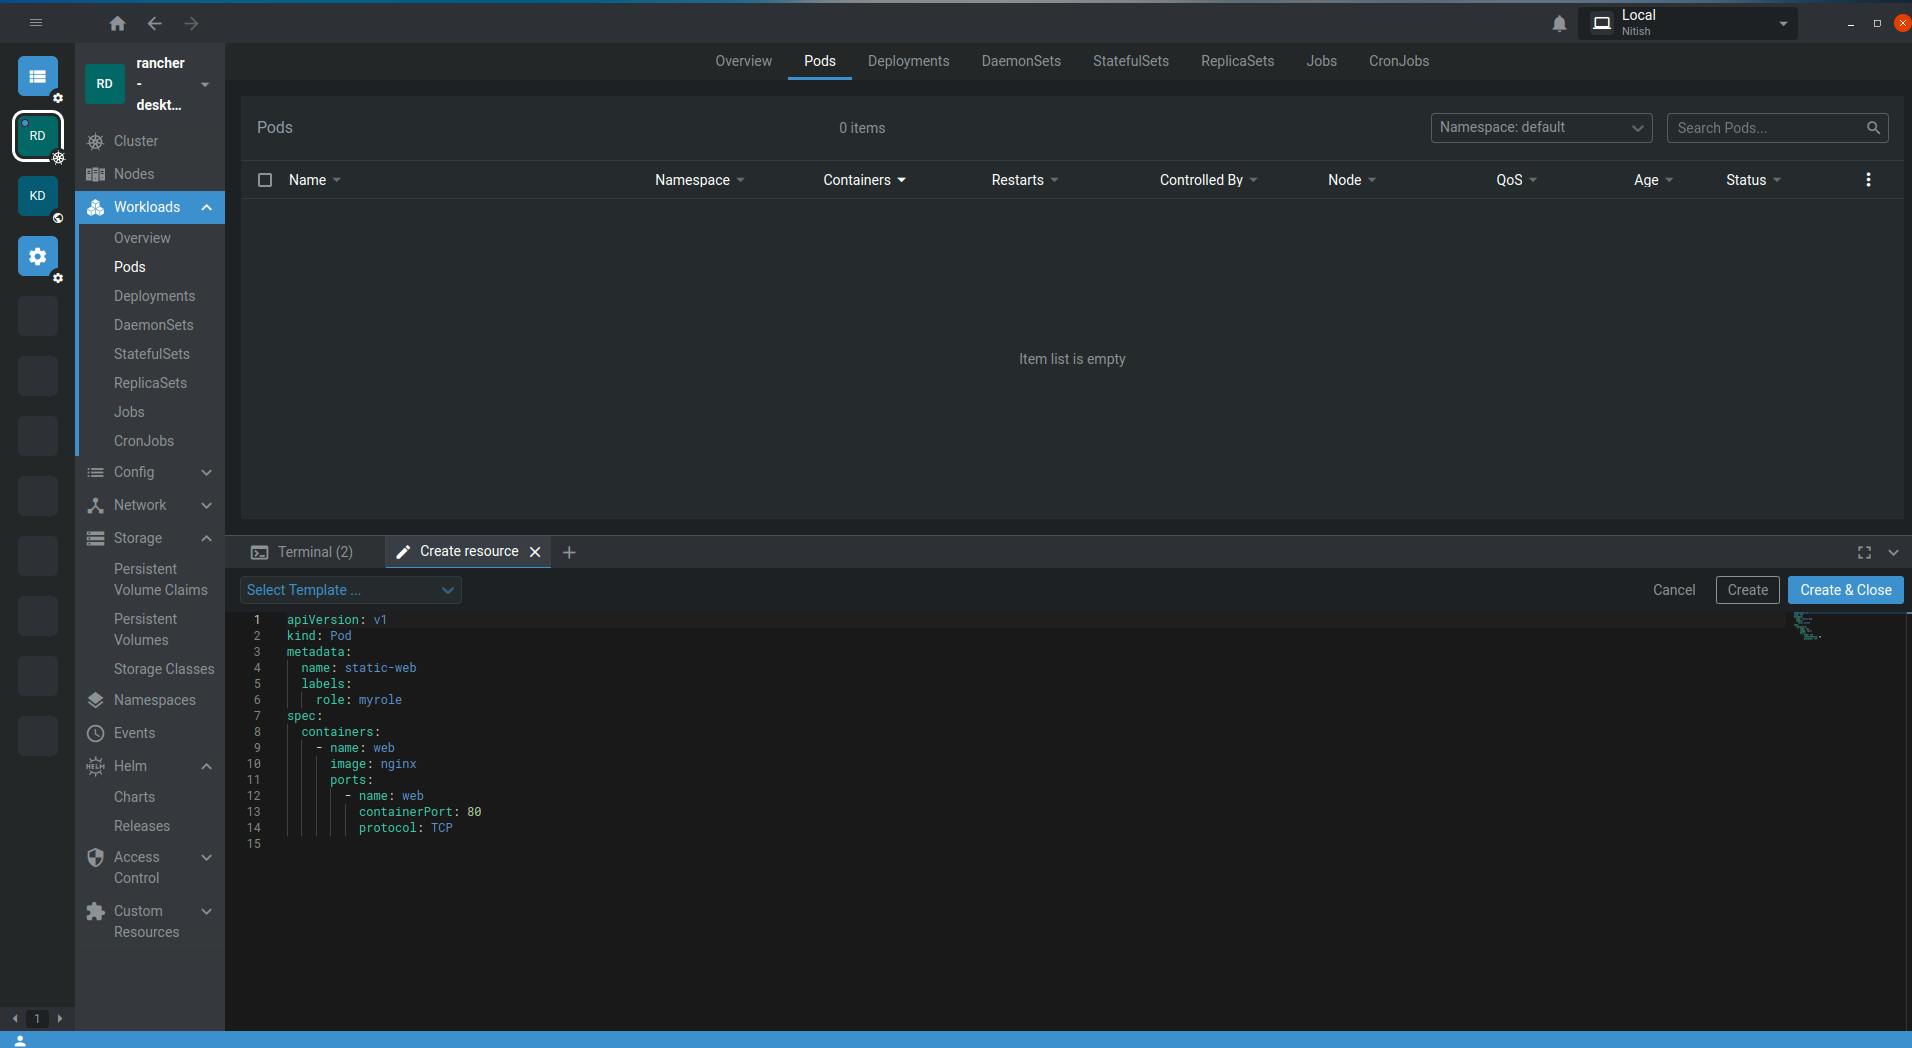
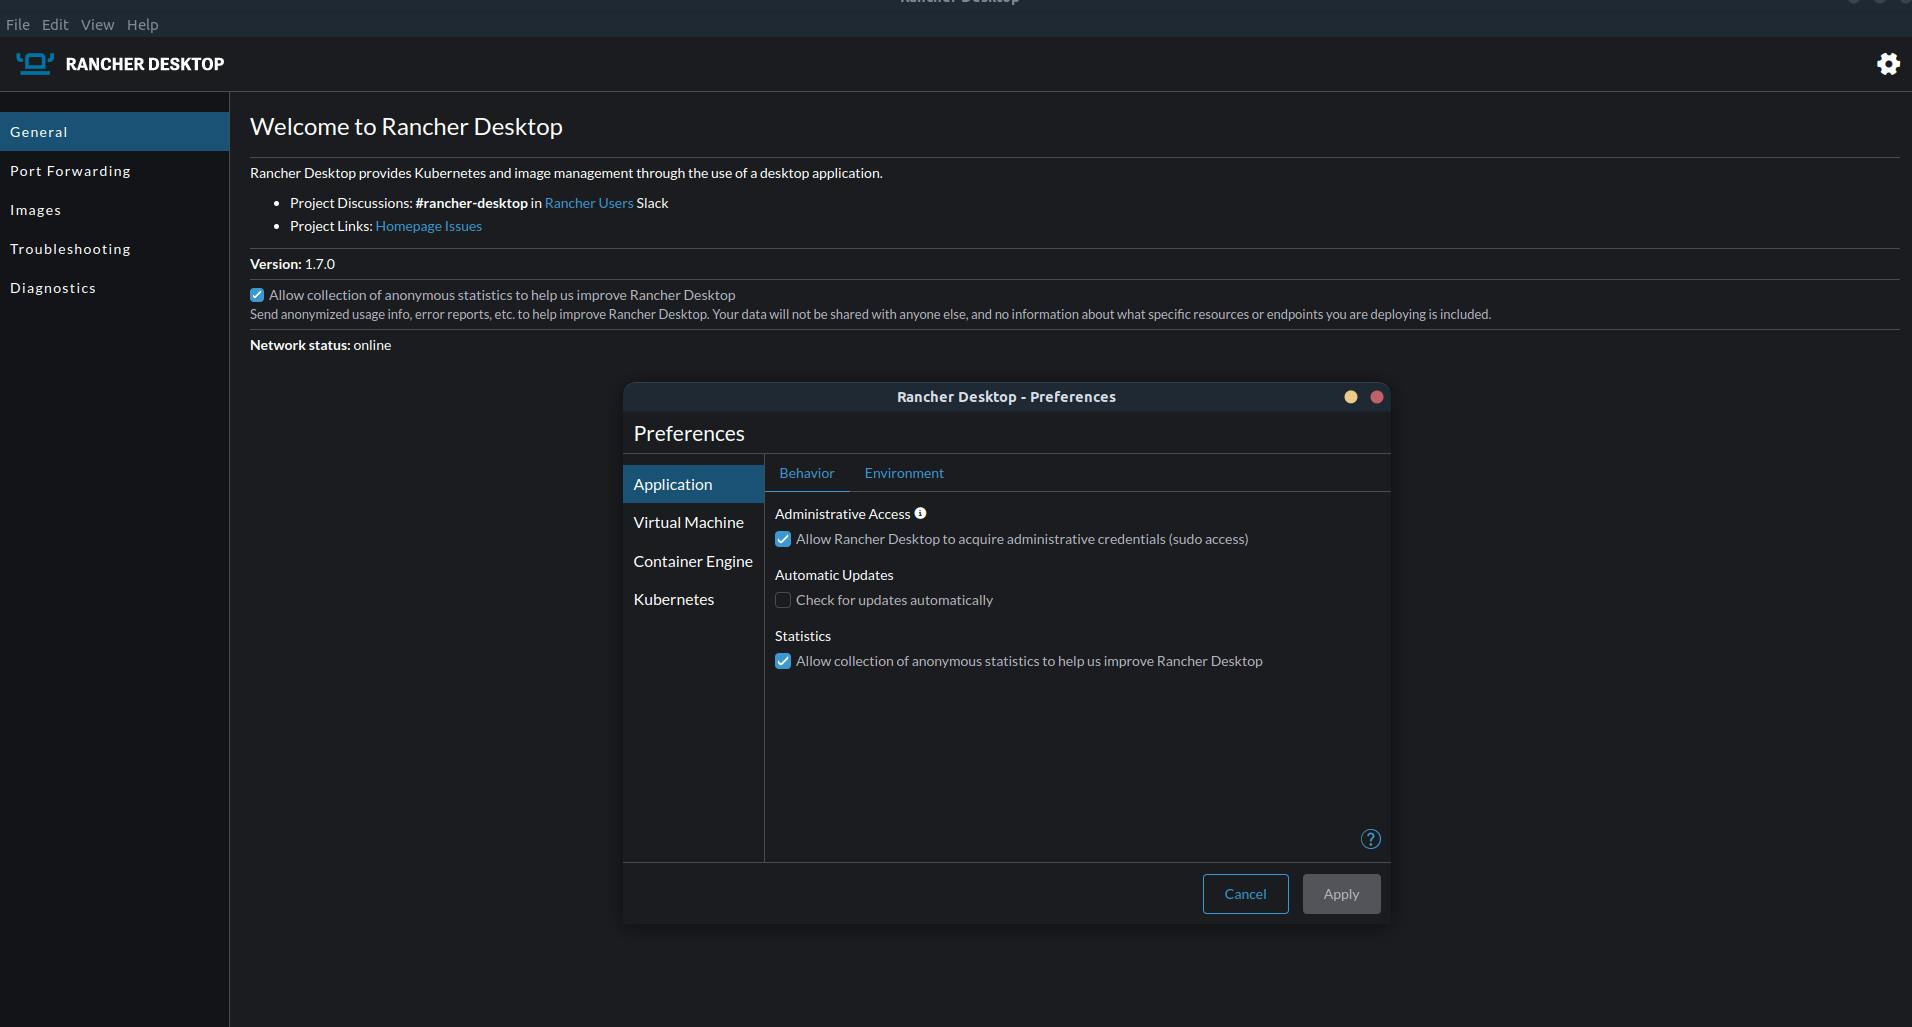
Rancher Desktop: For beginners, setting up a development environment for Kubernetes can be a complex and time-consuming process. The development environment needs to match the production environment closely to ensure that the application runs as expected. This can be challenging, especially for new developers who are not yet familiar with Kubernetes.
Rancher Desktop solves this problem by providing a simple and lightweight tool that allows developers to run Kubernetes clusters on their local machines. This means that they can develop and test their applications in an environment that closely resembles the production environment without having to worry about the complexities of setting up and managing the infrastructure.
Moreover, Rancher Desktop also provides a user-friendly graphical interface that simplifies the deployment of applications to Kubernetes clusters, making it easier for beginners to manage their clusters and deploy their applications with ease. This saves developers time and allows them to focus on developing their applications rather than dealing with infrastructure issues.
Not only this, but for learning practices there are various other platforms available online such as Killercoda that you can use to practice and play with Kubernetes cluster.
Wait. What is Killercoda? KillerCoda is a website that provides a playground environment for beginners to learn and experiment with Kubernetes. It allows users to spin up a Kubernetes cluster in a safe and isolated environment, where they can test and experiment with various Kubernetes features and configurations without the risk of damaging production environments. This makes it an excellent resource for those who are new to Kubernetes and want to learn by doing. It completely depends on the user whether they would like to go with Killercoda or Rancher Desktop at the beginning.
In case you're having trouble with when to use Lens and Rancher Desktop, know that Rancher Desktop is focused on providing a lightweight development environment for Kubernetes applications, while Lens IDE is designed to provide a powerful and comprehensive view of Kubernetes clusters and resources for more advanced users.
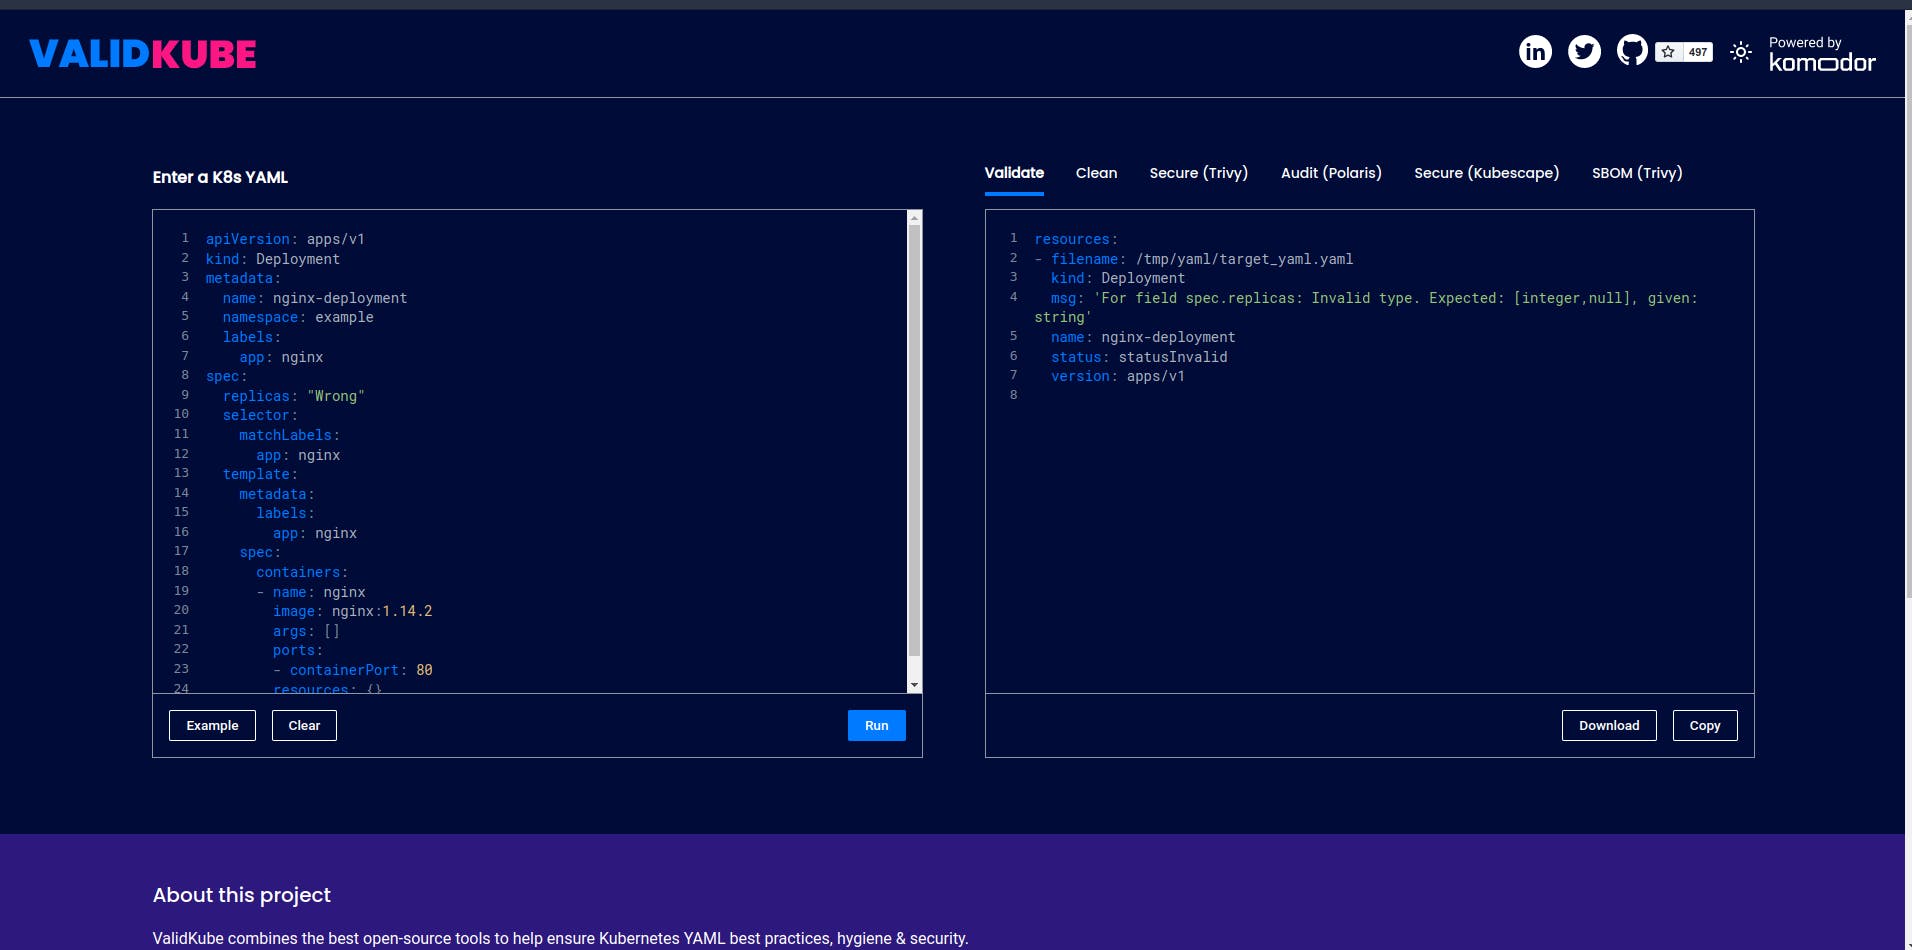
ValidKube: This tool runs on the web browser that provides all three important features in one place - validate, clean and secure. It is a tool that helps people who use Kubernetes make sure that everything is working properly. It does this by automatically checking the configurations and resources in Kubernetes to make sure they are following the best practices and rules for security and performance.
A configuration refers to the settings and parameters that determine how an application or service is deployed and run on the cluster. This includes details such as the number of replicas, the desired state of the application, the container images to be used, and the networking and storage configurations.
Resources, on the other hand, are the entities that Kubernetes uses to represent the different components of an application or service. These can include pods (which contain one or more containers), services (which provide a stable IP address and DNS name for the application), deployments (which manage the desired state of pods and replica sets), and many other types of objects that are used to define the state and behavior of the application.
ValidKube is like a "check-up" for your Kubernetes environment. it also helps to find any mistakes or problems in the configurations or resources, so that they can be fixed before they cause bigger problems. It is like a "detective" that looks for things that might cause trouble.
Not only will this tool debug your YAML manifest files, but it will also provide a way to resolve the issues in your manifest files and present the solutions in a clear, easy-to-understand manner.
Krew: Kubernetes is a powerful tool that helps manage containerized applications in a scalable and efficient way. However, some users may need additional functionality or features that are not provided by Kubernetes out of the box. That's where plugins come in.
Plugins are like "apps" or "extensions" that can be installed on a Kubernetes cluster to add new capabilities or features. They work alongside Kubernetes to provide additional functionality and can be used to enhance many aspects of Kubernetes, such as networking, storage, security, monitoring, and more.
For example, imagine that you need to monitor the performance and health of your Kubernetes cluster. You could install a plugin like Prometheus, which is a popular monitoring tool for Kubernetes. Once installed, Prometheus can collect metrics and data from your Kubernetes cluster, and provide insights into the performance and health of your applications and services.
Plugins are usually implemented as containers or binaries, which can be deployed on the Kubernetes cluster like any other resource. They can interact with the Kubernetes API to read or modify the state of the cluster, or they can be integrated with other Kubernetes tools or applications.
There are many plugins available for Kubernetes, both from the Kubernetes community and from third-party vendors. Users can choose the plugins that best meet their needs and install them on their Kubernetes clusters to enhance their functionality and capabilities.
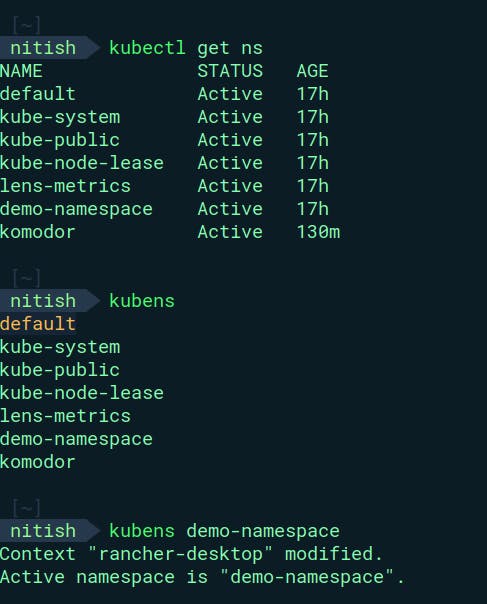
Starting with the first such plugin, Kubens for Kubernetes which helps developers and operators switch between different namespaces easily in the command line. In Kubernetes, namespaces are used to logically group and separate resources like pods, services, and deployments. However, managing multiple namespaces in the command line can be tedious and prone to errors.
Kubens solves this problem by allowing users to switch between different namespaces with a single command. This makes it easier for developers and operators to manage resources in different namespaces and reduces the risk of making mistakes while working with multiple namespaces.
For example, if you have three different namespaces for development, testing, and production environments, you can use Kubens to quickly switch between them and run commands on the appropriate namespace. This can save time and reduce the chance of accidentally running a command on the wrong namespace.
Kubens is a simple yet powerful tool that makes it easier to work with namespaces in Kubernetes and is especially useful for those who frequently work with multiple namespaces.
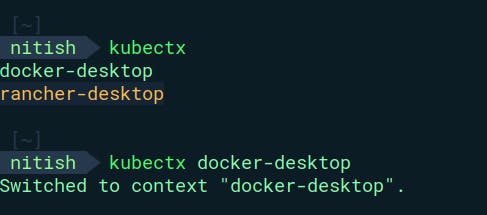
Similarly, To switch clusters, you can use the plugin called as kubectx .
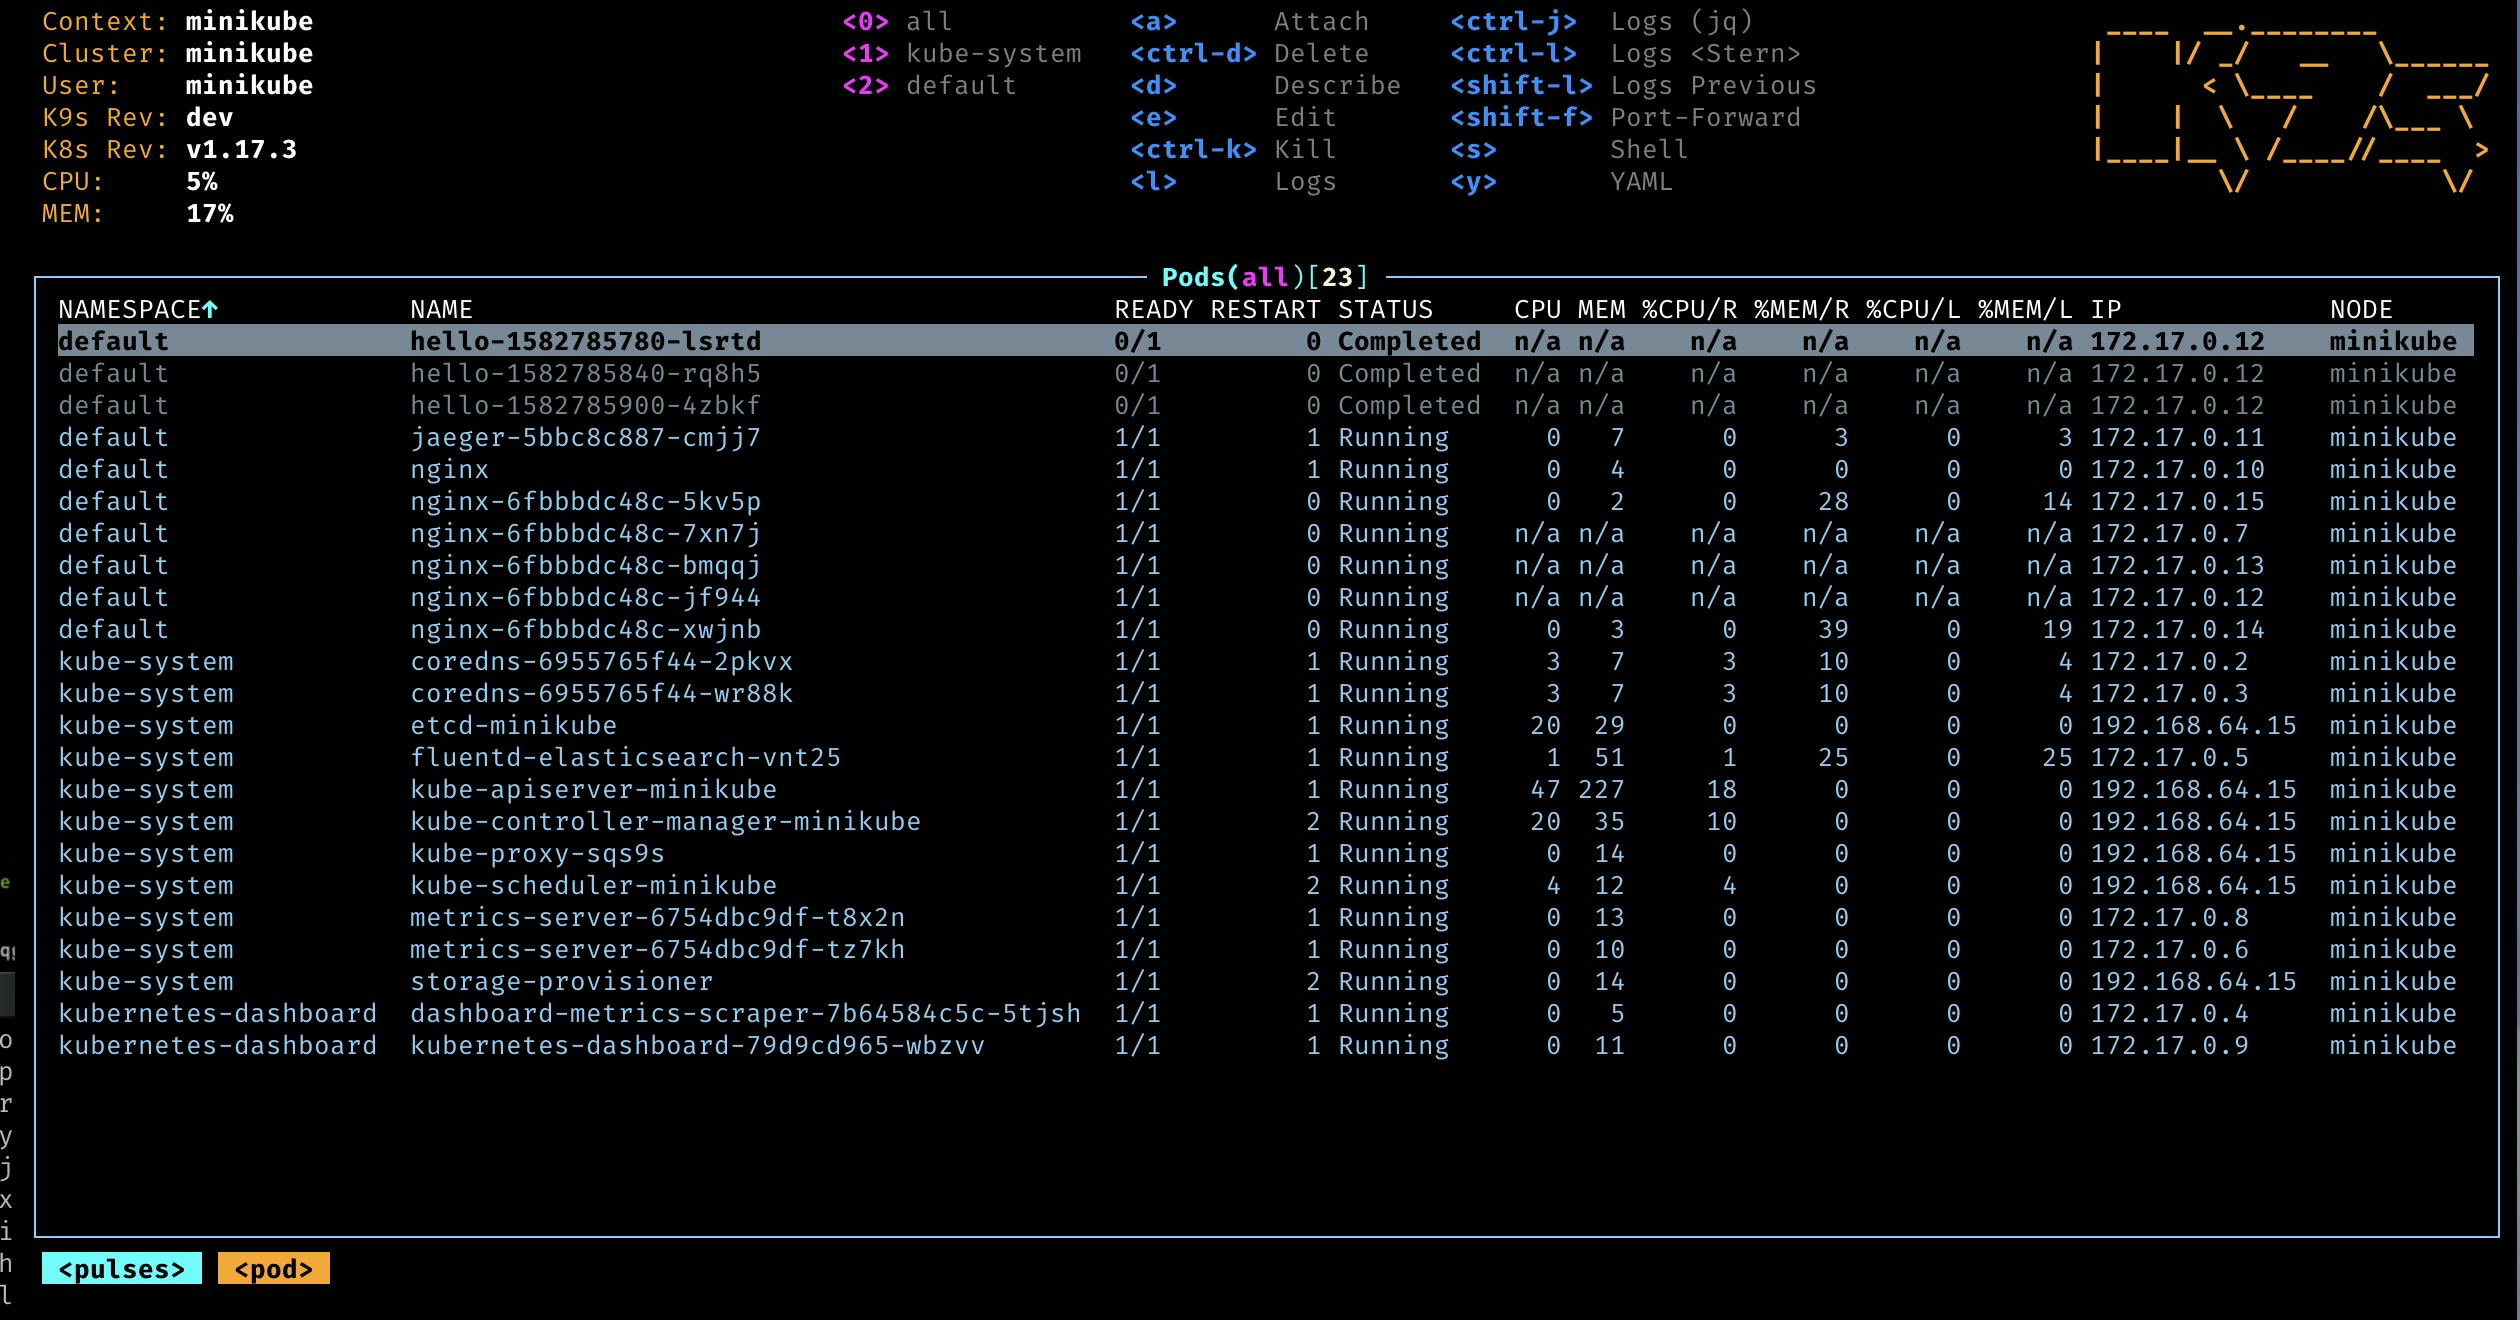
5. K9s: K9s is a tool that provides a user-friendly interface to manage and monitor Kubernetes clusters using the command line. Kubernetes is a popular platform used to deploy and manage containerized applications, but managing Kubernetes resources can be a complex task. K9s simplifies the management process and makes it easier for developers and system administrators to interact with Kubernetes clusters.
The K9s interface is designed to be user-friendly and intuitive. It allows users to view and interact with different Kubernetes resources such as pods, deployments, services, and volumes through a command-line interface. Users can easily filter, sort, and search for resources, as well as perform batch operations.
With K9s, users can quickly diagnose and troubleshoot issues by viewing the real-time status of Kubernetes resources. The tool also allows users to drill down into individual resources to view more detailed information about their state, such as CPU and memory usage. One of the advantages of K9s is that it is very easy to use. It is based on the terminal interface, which most developers and system administrators are familiar with. Users can quickly learn the commands and start managing their Kubernetes clusters more efficiently.
Now, you might be looking for the difference between Lens and K9s - "What is the difference between Lens and K9s", "Which one to use when?"
Here's the answer:
K9s is a command-line tool that provides a terminal interface for managing Kubernetes clusters. It is a lightweight tool that is focused on providing a fast and efficient way to manage and monitor resources using the command line. K9s provide a wide range of features, including real-time monitoring, filtering, sorting, and searching of Kubernetes resources. It is ideal for developers and system administrators who prefer a command-line interface and want a tool that is easy to use and highly configurable.
On the other hand, Lens is a desktop-based IDE that provides a graphical user interface for managing Kubernetes clusters. It is designed to provide a complete and unified view of the Kubernetes ecosystem, with a range of features for managing and monitoring clusters, including resource usage, logs, and events. Lens provides an intuitive interface that makes it easy to navigate and understand complex Kubernetes environments. It is ideal for users who prefer a graphical interface and want a complete view of their Kubernetes clusters.
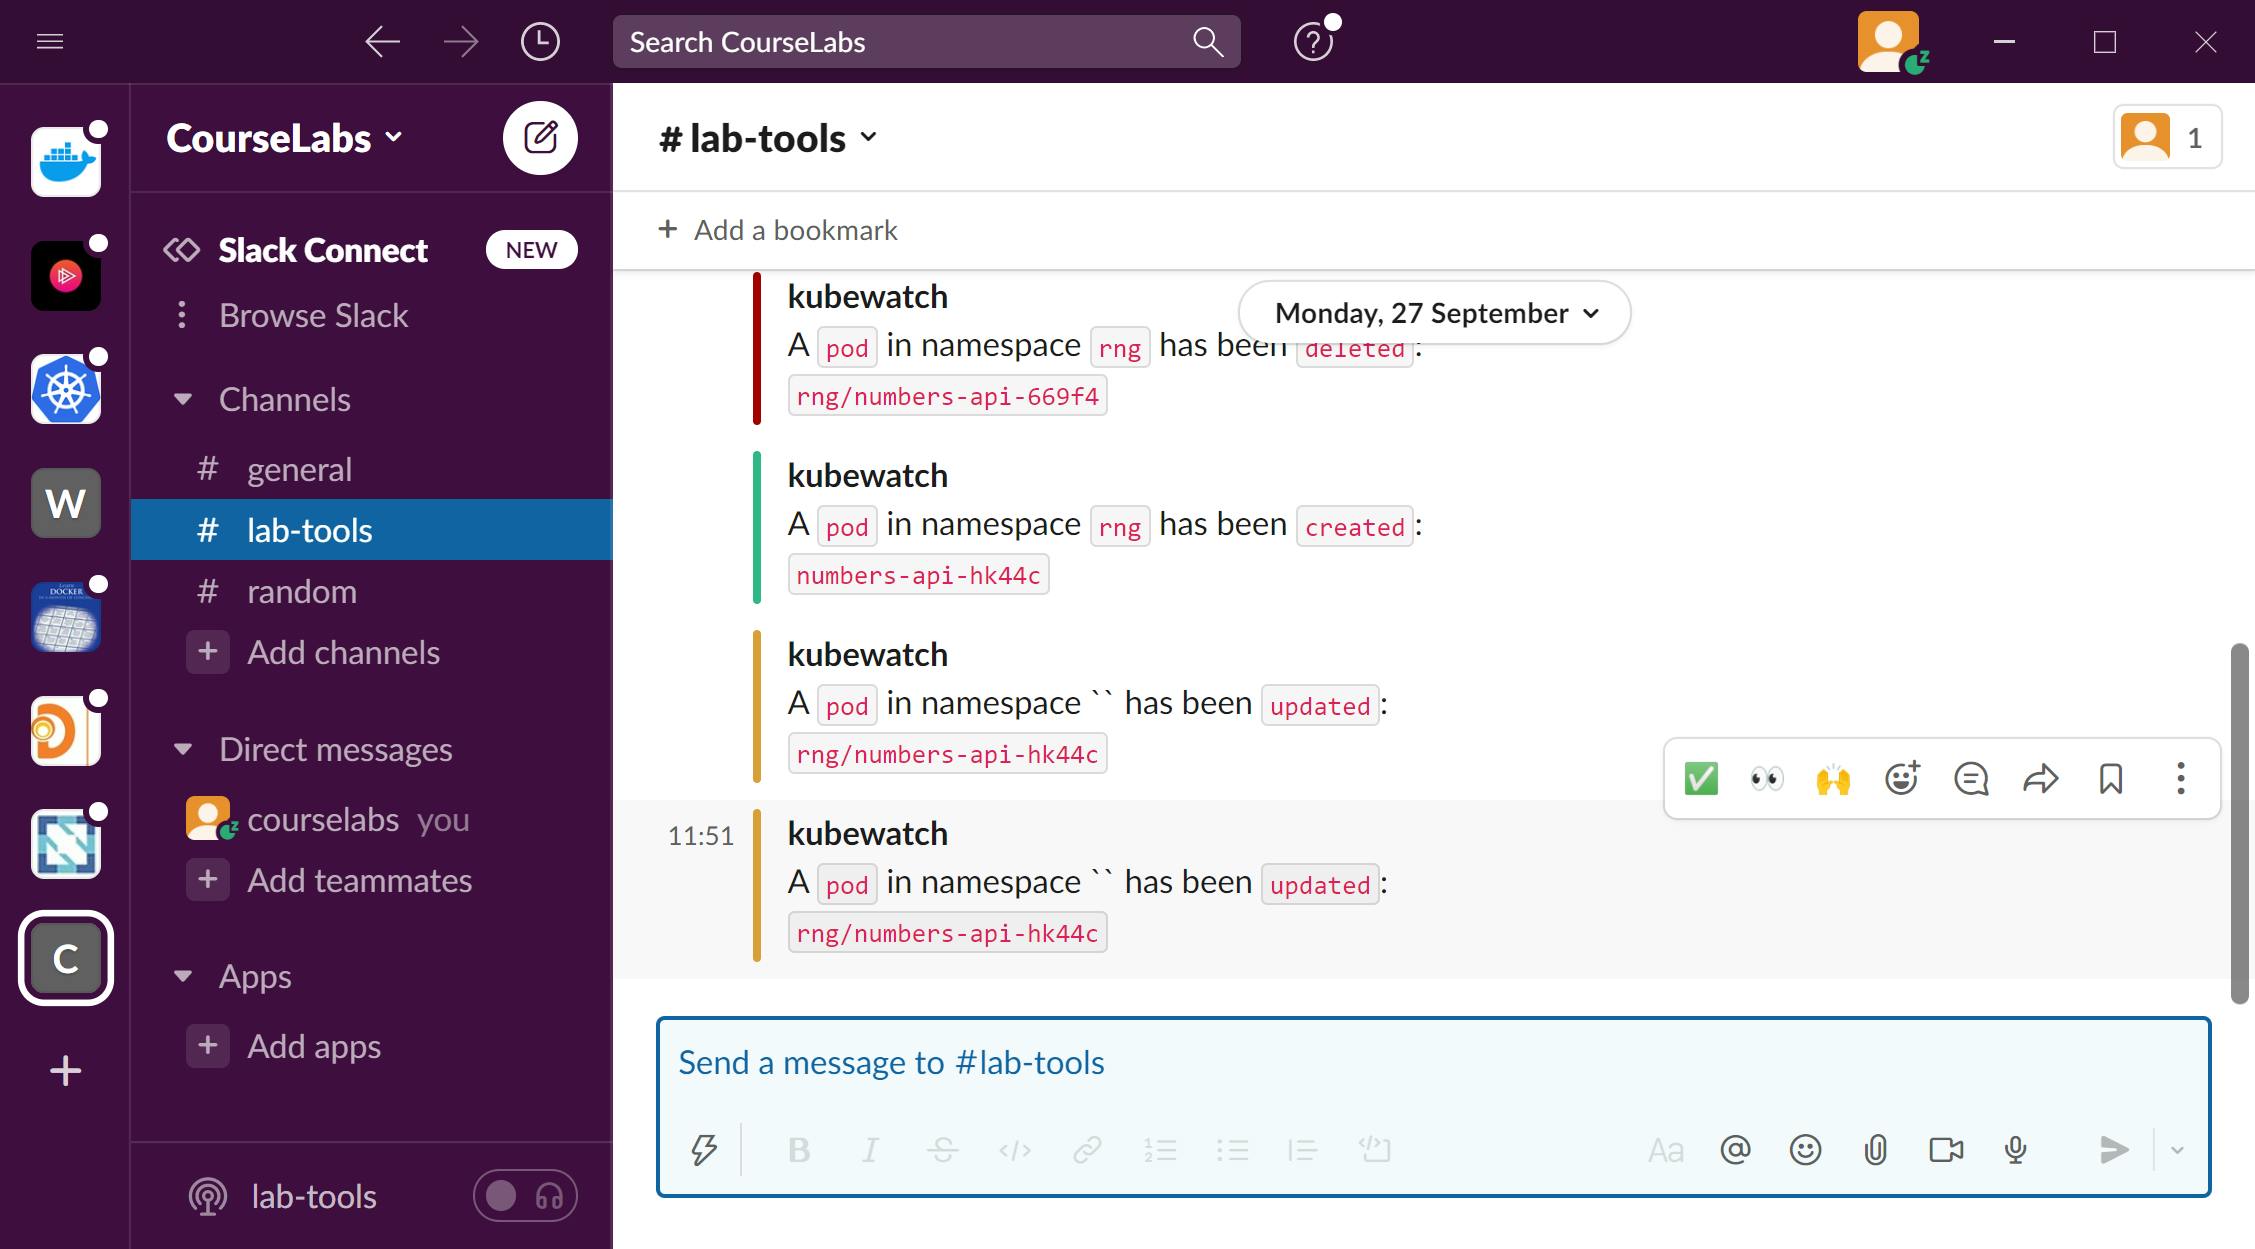
6. Kubewatch: Before trying to understand how Kubewatch helps you, let's take a look at what are Kubernetes events. In Kubernetes, an "event" is a record of something that happened to a resource in the cluster, such as a pod being created, deleted, or updated. When something happens to a resource, Kubernetes generates an event, which is stored in the Kubernetes API server. These events can be useful for monitoring the health of your cluster and troubleshooting issues. For example, if a pod fails to start, Kubernetes will generate an event to indicate that the pod has failed. The event will include information such as the reason for the failure, the specific error message, and the name of the pod. This information can help you identify and resolve the issue.
Kubewatch is a tool that helps you keep an eye on what's happening in your Kubernetes environment. When something changes, like a new pod being created or an existing one being deleted, Kubewatch will let you know. You can choose to get these notifications through different channels like Slack or email.
This can be really helpful because it lets you know what's going on in your Kubernetes environment in real time. Kubewatch also supports custom filters, so you can fine-tune the events that trigger notifications. For example, you could configure Kubewatch to only send notifications when a pod is created in a specific namespace, or when a deployment reaches a certain number of replicas.
You can quickly react to any issues that come up and make sure everything is running smoothly. It's like having a personal assistant that tells you what's happening in your Kubernetes world!
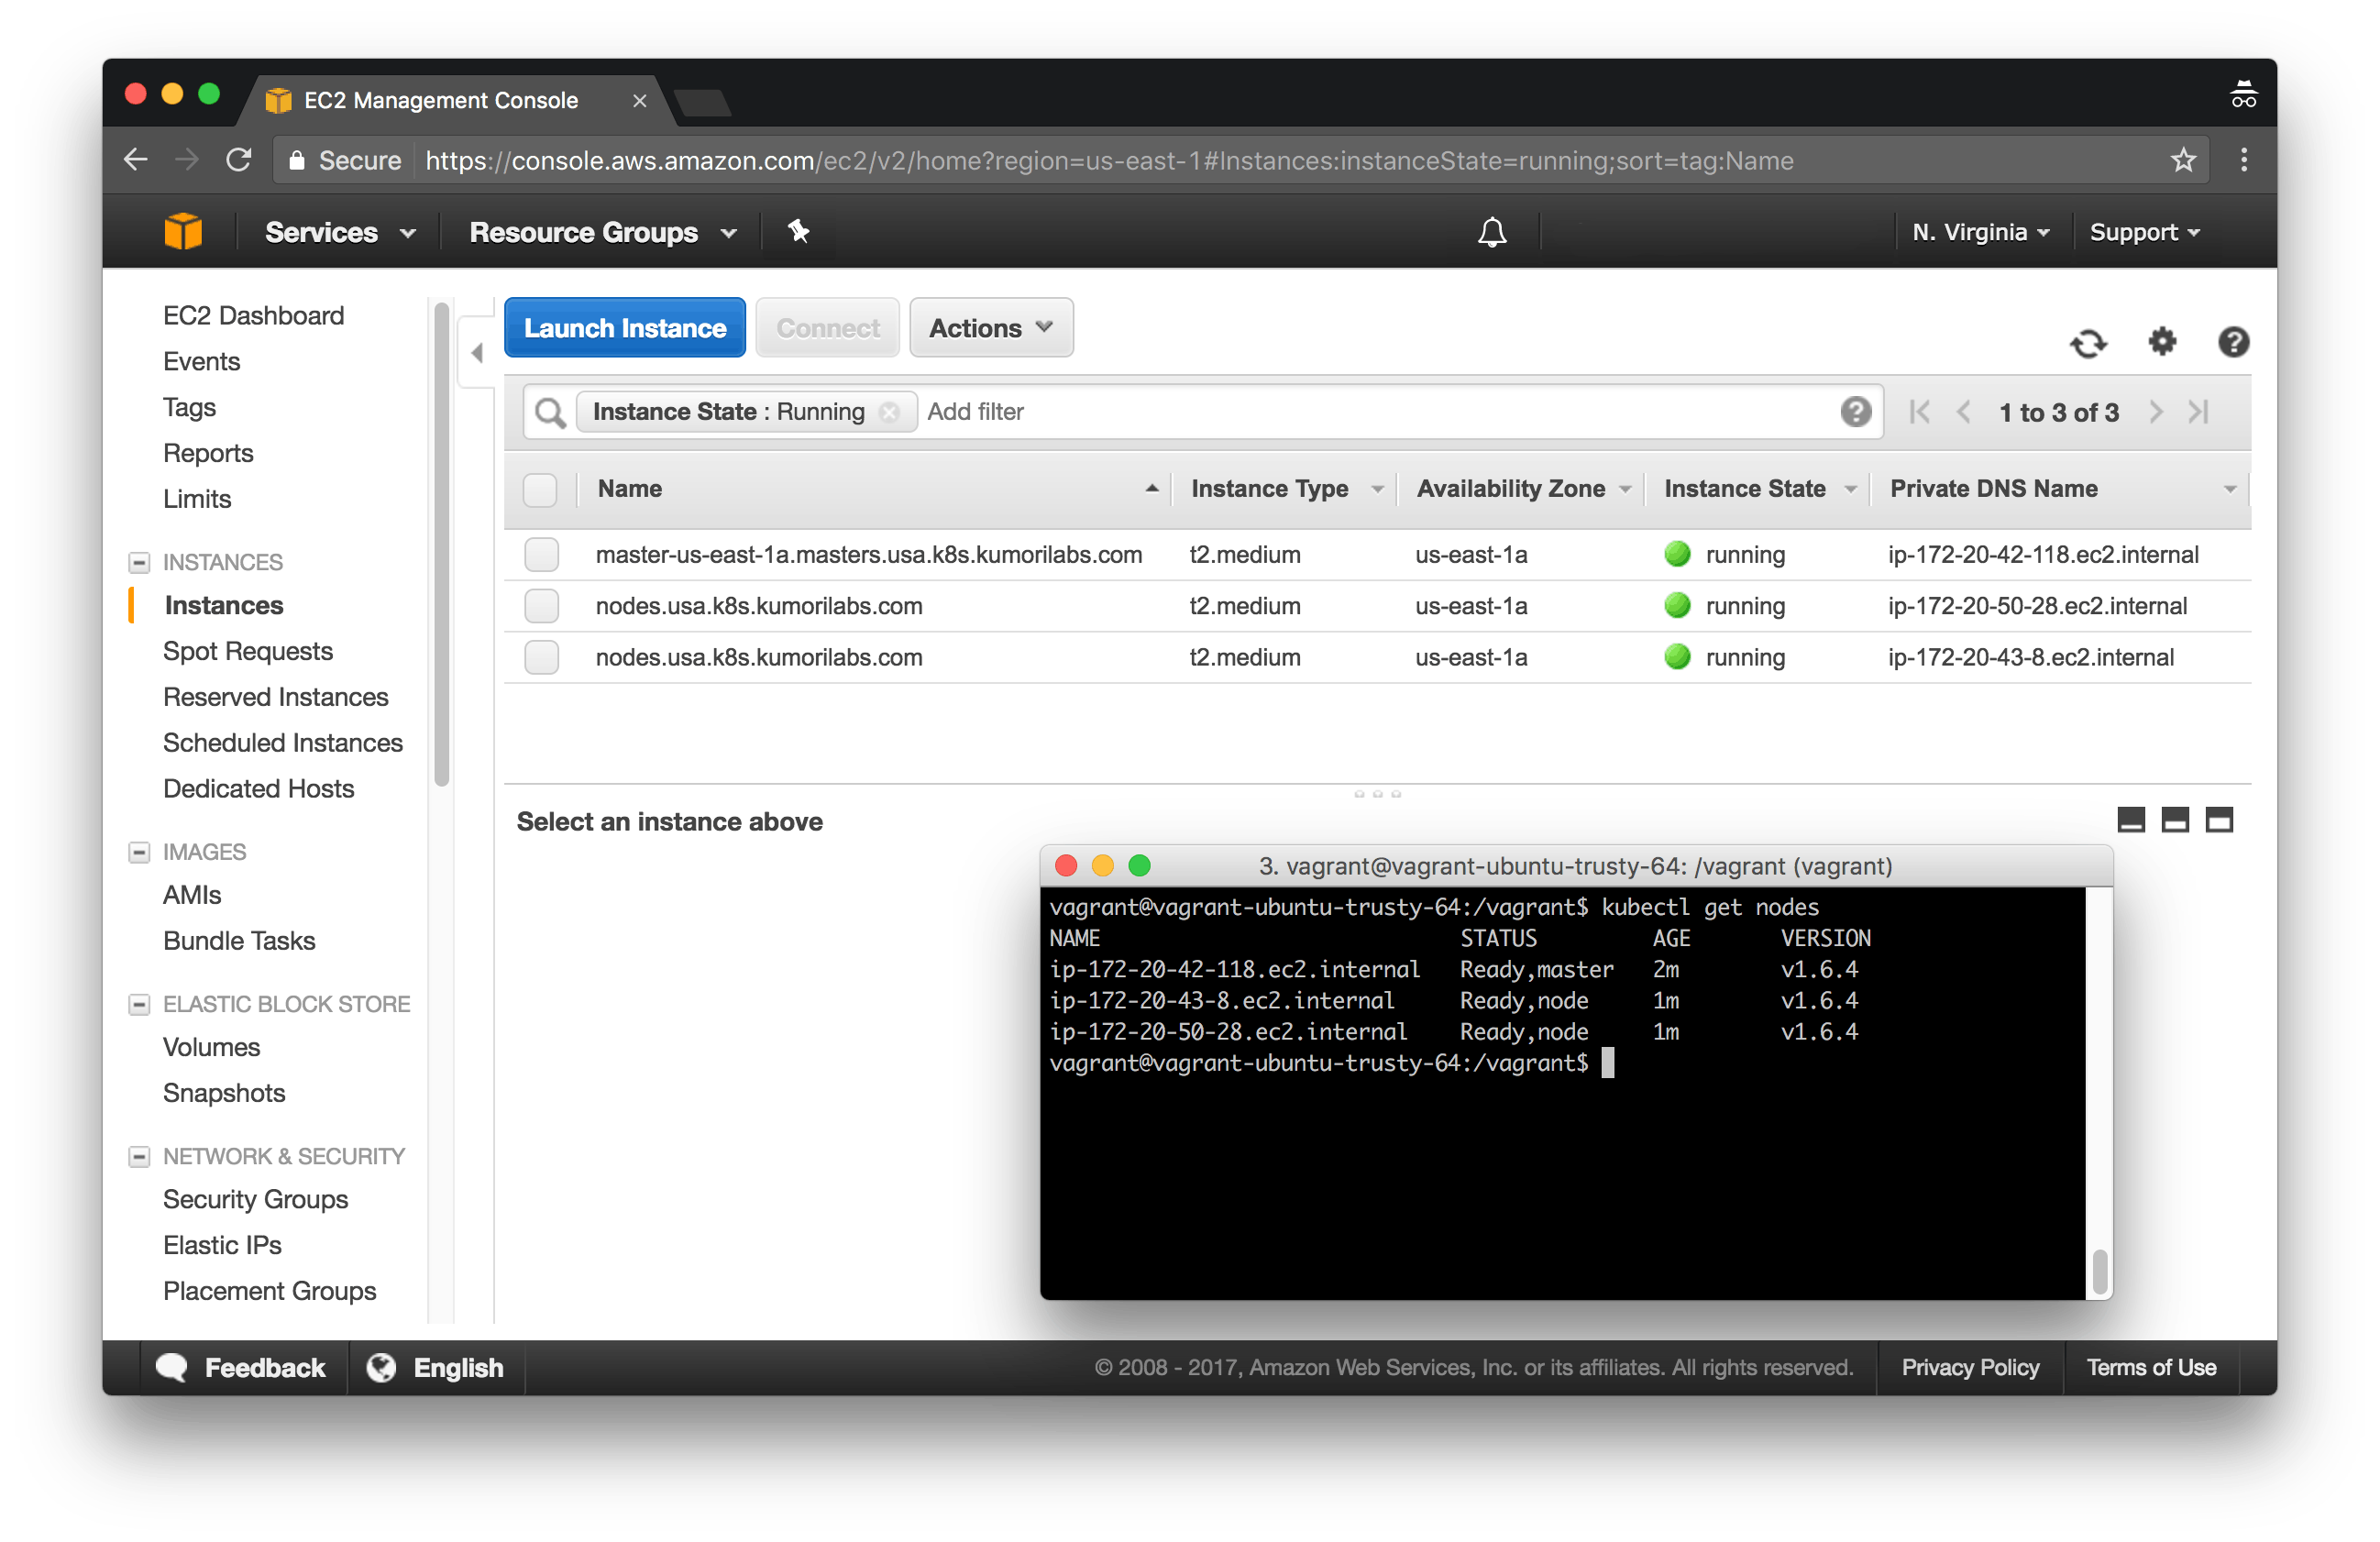
7. Kops: Kops, also known as Kubernetes operations, is an open-source project which helps you create, destroy, upgrade, and maintain a highly available, production-grade Kubernetes cluster. Deploying and managing Kubernetes clusters can be a complex and time-consuming process, especially when it comes to managing the underlying infrastructure. Kops solves this problem by automating the deployment and management of Kubernetes clusters on AWS, removing the need for manual configuration and setup.
With Kops, you don't need to worry about the underlying infrastructure of your cluster, as it takes care of all the heavy lifting for you. Underlying Infrastructure refers to the underlying computing resources and services that are required to run a Kubernetes cluster. This includes virtual machines, networking, storage, load balancers, security groups, and other AWS services that are needed to support the cluster. Setting up and configuring these resources manually can be a challenging and time-consuming process, especially for those who are new to Kubernetes. Kops helps to simplify this process by automating the deployment and management of these resources so that users can focus on managing their applications and workloads in the cluster.
You can easily create and manage a cluster using simple command-line tools, without having to spend hours figuring out the complexities of the AWS environment. Kops also helps to ensure that your cluster is always up-to-date with the latest Kubernetes version and security patches by providing automated upgrades. It also provides additional features like backups and restores, which can help you recover your cluster in case of any unexpected failures.
8. Sops: Sops is a tool that helps solve the problem of managing sensitive data in Kubernetes. In Kubernetes, secrets are used to store sensitive data like passwords and API keys. However, managing these secrets can be challenging, especially when working with large and complex Kubernetes clusters.
Sops address this challenge by providing a secure and convenient way to manage secrets in Kubernetes. It encrypts sensitive data using a secure encryption algorithm and stores them in a secure manner. With Sops, you can easily manage your secrets and ensure that they are only accessible to authorized users. Additionally, it provides a simple way to rotate secrets, which is important for maintaining security and compliance.
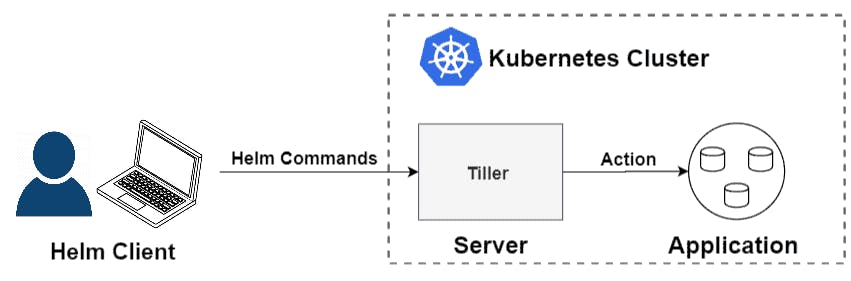
9. Helm: Helm is a package manager for Kubernetes applications that includes templating and lifecycle management functionality. It is essentially a package manager for Kubernetes manifests (such as Deployments, ConfigMaps, Services, etc.) that are grouped into charts. A chart is a template for creating and deploying applications on the Kubernetes cluster using Helm. Just like Dockerfile acts as a template for the image, the helm chart acts as a template for the application containing multiple dependencies and packages to be deployed on the Kubernetes cluster. Think of Helm Charts as a bundle of pre-configured Kubernetes resources that can be easily deployed and managed together.
10. Kustomize: Imagine that you have a Kubernetes application running in production, and you need to deploy it to a new environment with slightly different configurations. You could create a separate set of configuration files for the new environment, but this would require duplicating a lot of the code and making it difficult to maintain in the long run.
This is where Kustomize comes in. Kustomize allows you to create overlays that can modify existing YAML files without having to duplicate the entire file. You can simply add a new patch file that contains only the changes needed for the new environment, and Kustomize will apply the patches to the existing files at runtime.
For example, you could use Kustomize to deploy your application to a staging environment with fewer replicas than the production environment, and then easily switch to the production environment by applying a patch file that increases the number of replicas. This way, you can manage different environments with minimal duplication and keep your configurations organized and maintainable.

There are some differences between Kustomize and Helm, although both tools are used for managing Kubernetes applications.
Kustomize is a native Kubernetes tool that allows you to customize your Kubernetes resources, such as deployments, services, and config maps, without modifying the original YAML files. Kustomize uses a set of patches and overlays to apply the desired changes to the base Kubernetes resources. It helps in managing configurations across different environments and eliminates the need for managing multiple versions of the same configuration files.
On the other hand, Helm is a package manager for Kubernetes that allows you to define, install, and upgrade complex applications using charts. A Helm chart is a collection of YAML files that defines Kubernetes resources and their configurations. Helm uses templates and values to generate Kubernetes manifests that can be deployed to the cluster. Helm also supports versioning, rollbacks, and dependency management, making it easier to manage complex applications.
11. Cert-Manager: Before understanding the use-case of Cert-Manager, let's try to understand what is SSL/TLS encryption.
SSL/TLS encryption is a security protocol used to protect communication between two endpoints over the internet, such as a web browser and a web server. It works by encrypting data transmitted between the endpoints, ensuring that no unauthorized third party can intercept or read the data. SSL/TLS encryption is commonly used to secure online transactions and protect sensitive information, such as credit card details and personal data, from being stolen or compromised. It is indicated by a padlock icon in the browser's address bar and the URL starting with "https".
Now, Let's say you have a website hosted on Kubernetes and you want to secure it with SSL/TLS encryption. You need to obtain a certificate from a trusted certificate authority (CA) and configure it on your website's load balancer or ingress controller. This process involves multiple steps such as generating a certificate signing request (CSR), submitting it to a CA, obtaining a signed certificate, and configuring it on your Kubernetes resources. This can be a complex and time-consuming process, especially if you have multiple websites or microservices to secure.
This is where Cert Manager comes in. It automates the process of obtaining, renewing, and configuring TLS certificates for your Kubernetes resources. You can define certificate issuers and certificate requests as Kubernetes resources and Cert Manager will handle the rest. It supports multiple certificate authorities such as Let's Encrypt, Venafi, and HashiCorp Vault, and can automatically renew certificates before they expire. With Cert Manager, you can ensure that all your Kubernetes resources are automatically secured with TLS encryption, without the need for manual intervention.
12. ExternalDNS: External-DNS is a Kubernetes add-on that automates the management of external DNS records. It monitors changes to Kubernetes services and ingresses, and updates the external DNS provider (such as AWS, Google Cloud DNS, etc.) with the corresponding DNS records.
Kubernetes Service is a way to provide a stable IP address and DNS name to access a group of Pods in a deployment. It enables network communication between different parts of an application. In other words, it acts as an abstraction layer over the Pods to provide a consistent way of accessing them.
Kubernetes Ingress is a way to provide external access to the services running inside the Kubernetes cluster. It acts as a reverse proxy and provides a single entry point for external traffic to reach multiple services. It can route traffic based on rules and perform SSL/TLS termination to provide secure communication
if you create a Kubernetes service with the hostname "myapp.example.com", External-DNS will automatically create a DNS record for "myapp.example.com" in the external DNS provider, and map it to the IP address of the Kubernetes service. This allows external clients to access the service using the DNS name instead of the IP address.
13. Ingress-NGINX: Let's say you have a web application running on a Kubernetes cluster that is exposed to the internet through an external service. However, you want to give your users a more user-friendly URL like "example.com" instead of having them use the IP address and NodePort number to access your application.
Here's where an Ingress controller like NGINX comes in handy. You can create an Ingress resource that defines the rules for routing incoming traffic to different backend services based on the URL path or host. Then, you can deploy an NGINX Ingress controller to your Kubernetes cluster to manage the Ingress resource and handle the actual traffic routing.
With NGINX Ingress, you can configure SSL/TLS encryption, load balancing, and other advanced routing options to your application. This allows you to expose your application through a single IP address and port while also providing a more user-friendly and secure experience for your users.
Conclusion:
In conclusion, Kubernetes can be a complex system to manage, but with the help of these beginner-friendly tools, you can ease your way into the world of Kubernetes. From Lens IDE and Rancher Desktop to Kustomize and Cert Manager, these tools can help you manage your Kubernetes deployments with ease. Keep in mind that the Kubernetes ecosystem is vast and ever-evolving, so don't be afraid to explore and experiment with new tools that can make your workflow even more efficient.
Feeling overwhelmed?
Here are some points for beginners on selecting the right tool while learning Kubernetes:
Start with the basics: Begin with the core Kubernetes concepts and try to understand them before jumping into tools.
Identify your needs: Different tools serve different purposes. Identify your needs and choose the tools accordingly.
Check compatibility: Ensure that the tool you are using is compatible with your Kubernetes cluster version.
Look for community support: Check if the tool has an active community and support available. This can be helpful when you encounter issues.
Learn one tool at a time: Do not get overwhelmed with the variety of tools available. Learn one tool at a time and gradually expand your knowledge.
Avoid using all tools at once: It is not necessary to use all the tools available. Use only the necessary tools that you need to achieve your goals.
Remember, learning Kubernetes can be overwhelming at times, but it's important to take it one step at a time. Focus on the basics, identify your needs, and gradually expand your knowledge with the right tools. Happy learning!