Hi there! In this blog, we'll take a closer look at what are Kubernetes Services and how they help you to connect with your application running on various Pods. We'll be going through a complete hands-on demo for a better understanding of Kubernetes Services.
Before diving right into it, let's take a look at how you will access your application running inside a Pod.
In order to connect with your application inside a Pod, a user needs to connect with it. This can be done by assigning an IP address to each Pod. However, this is not as simple as it sounds. Since Pods are ephemeral in nature, the IP addresses assigned to the Pods can't be static.
Consider a scenario where an operator is managing the Pod and the user is accessing the Pod directly with their individual IP addresses.
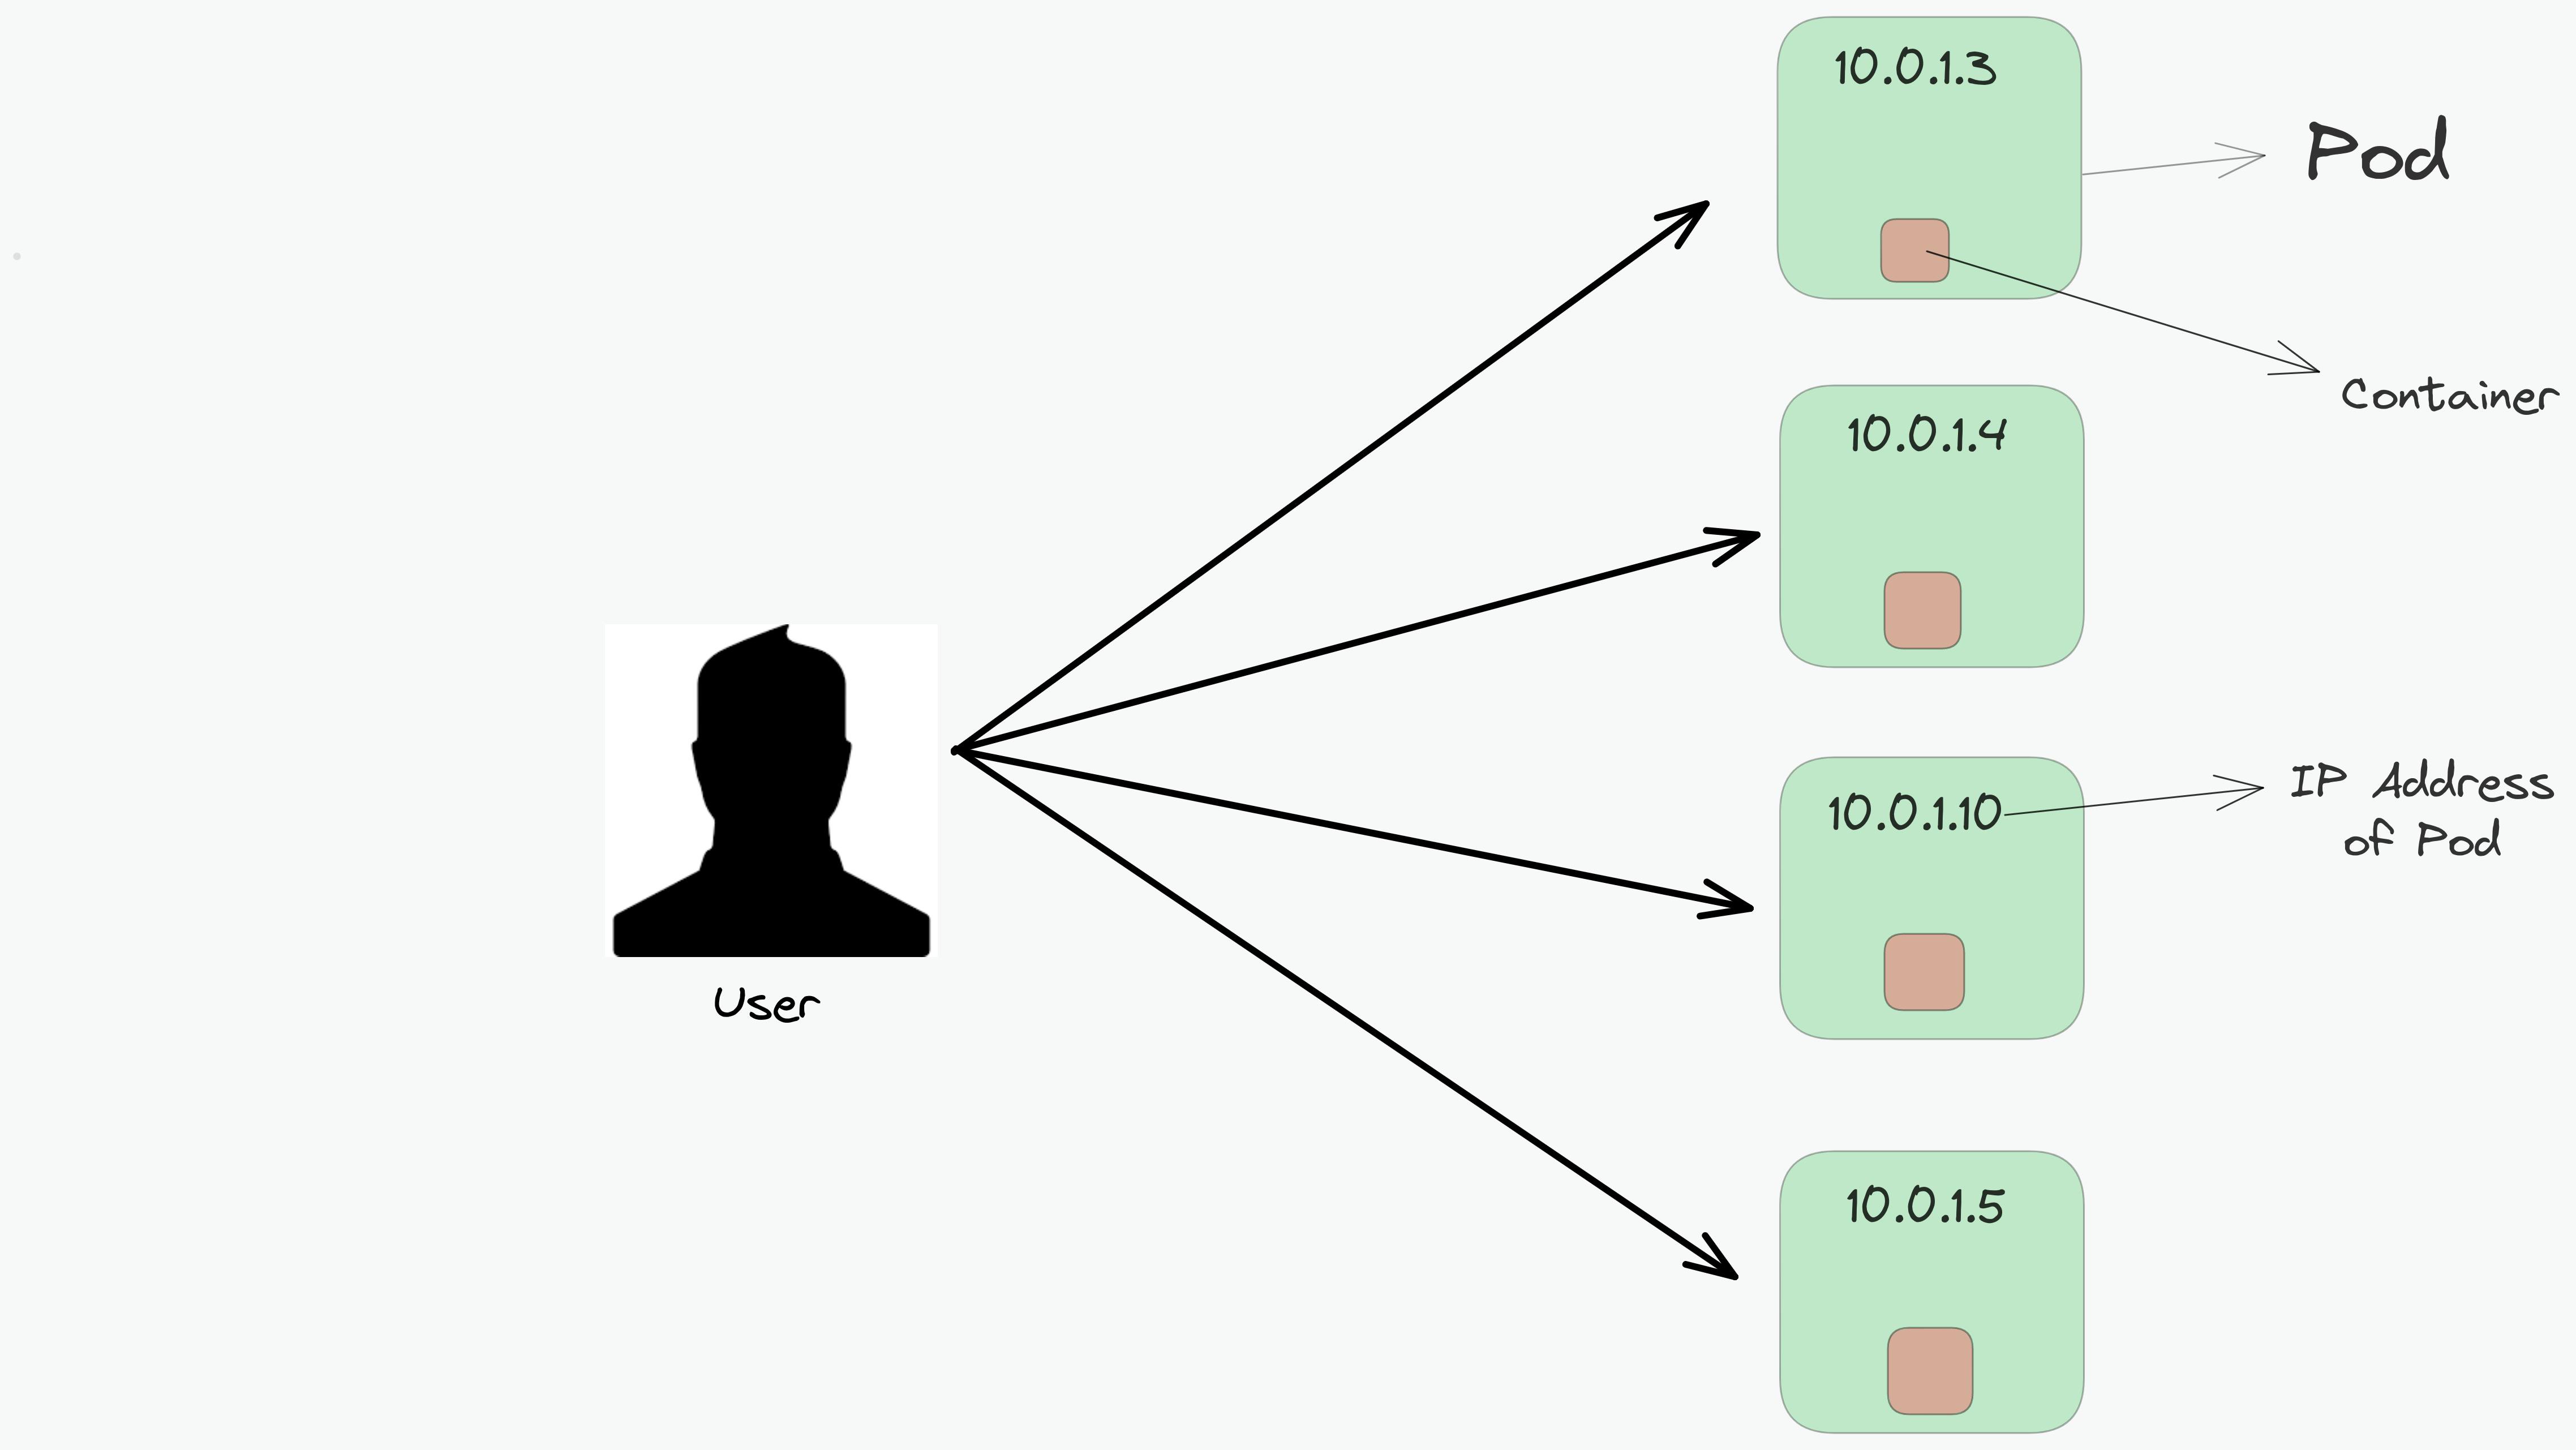
After a few times, one of the Pods suddenly gets terminated and a new Pod is created by the operator. The new Pod will have a new IP address that will not be immediately known by the user.
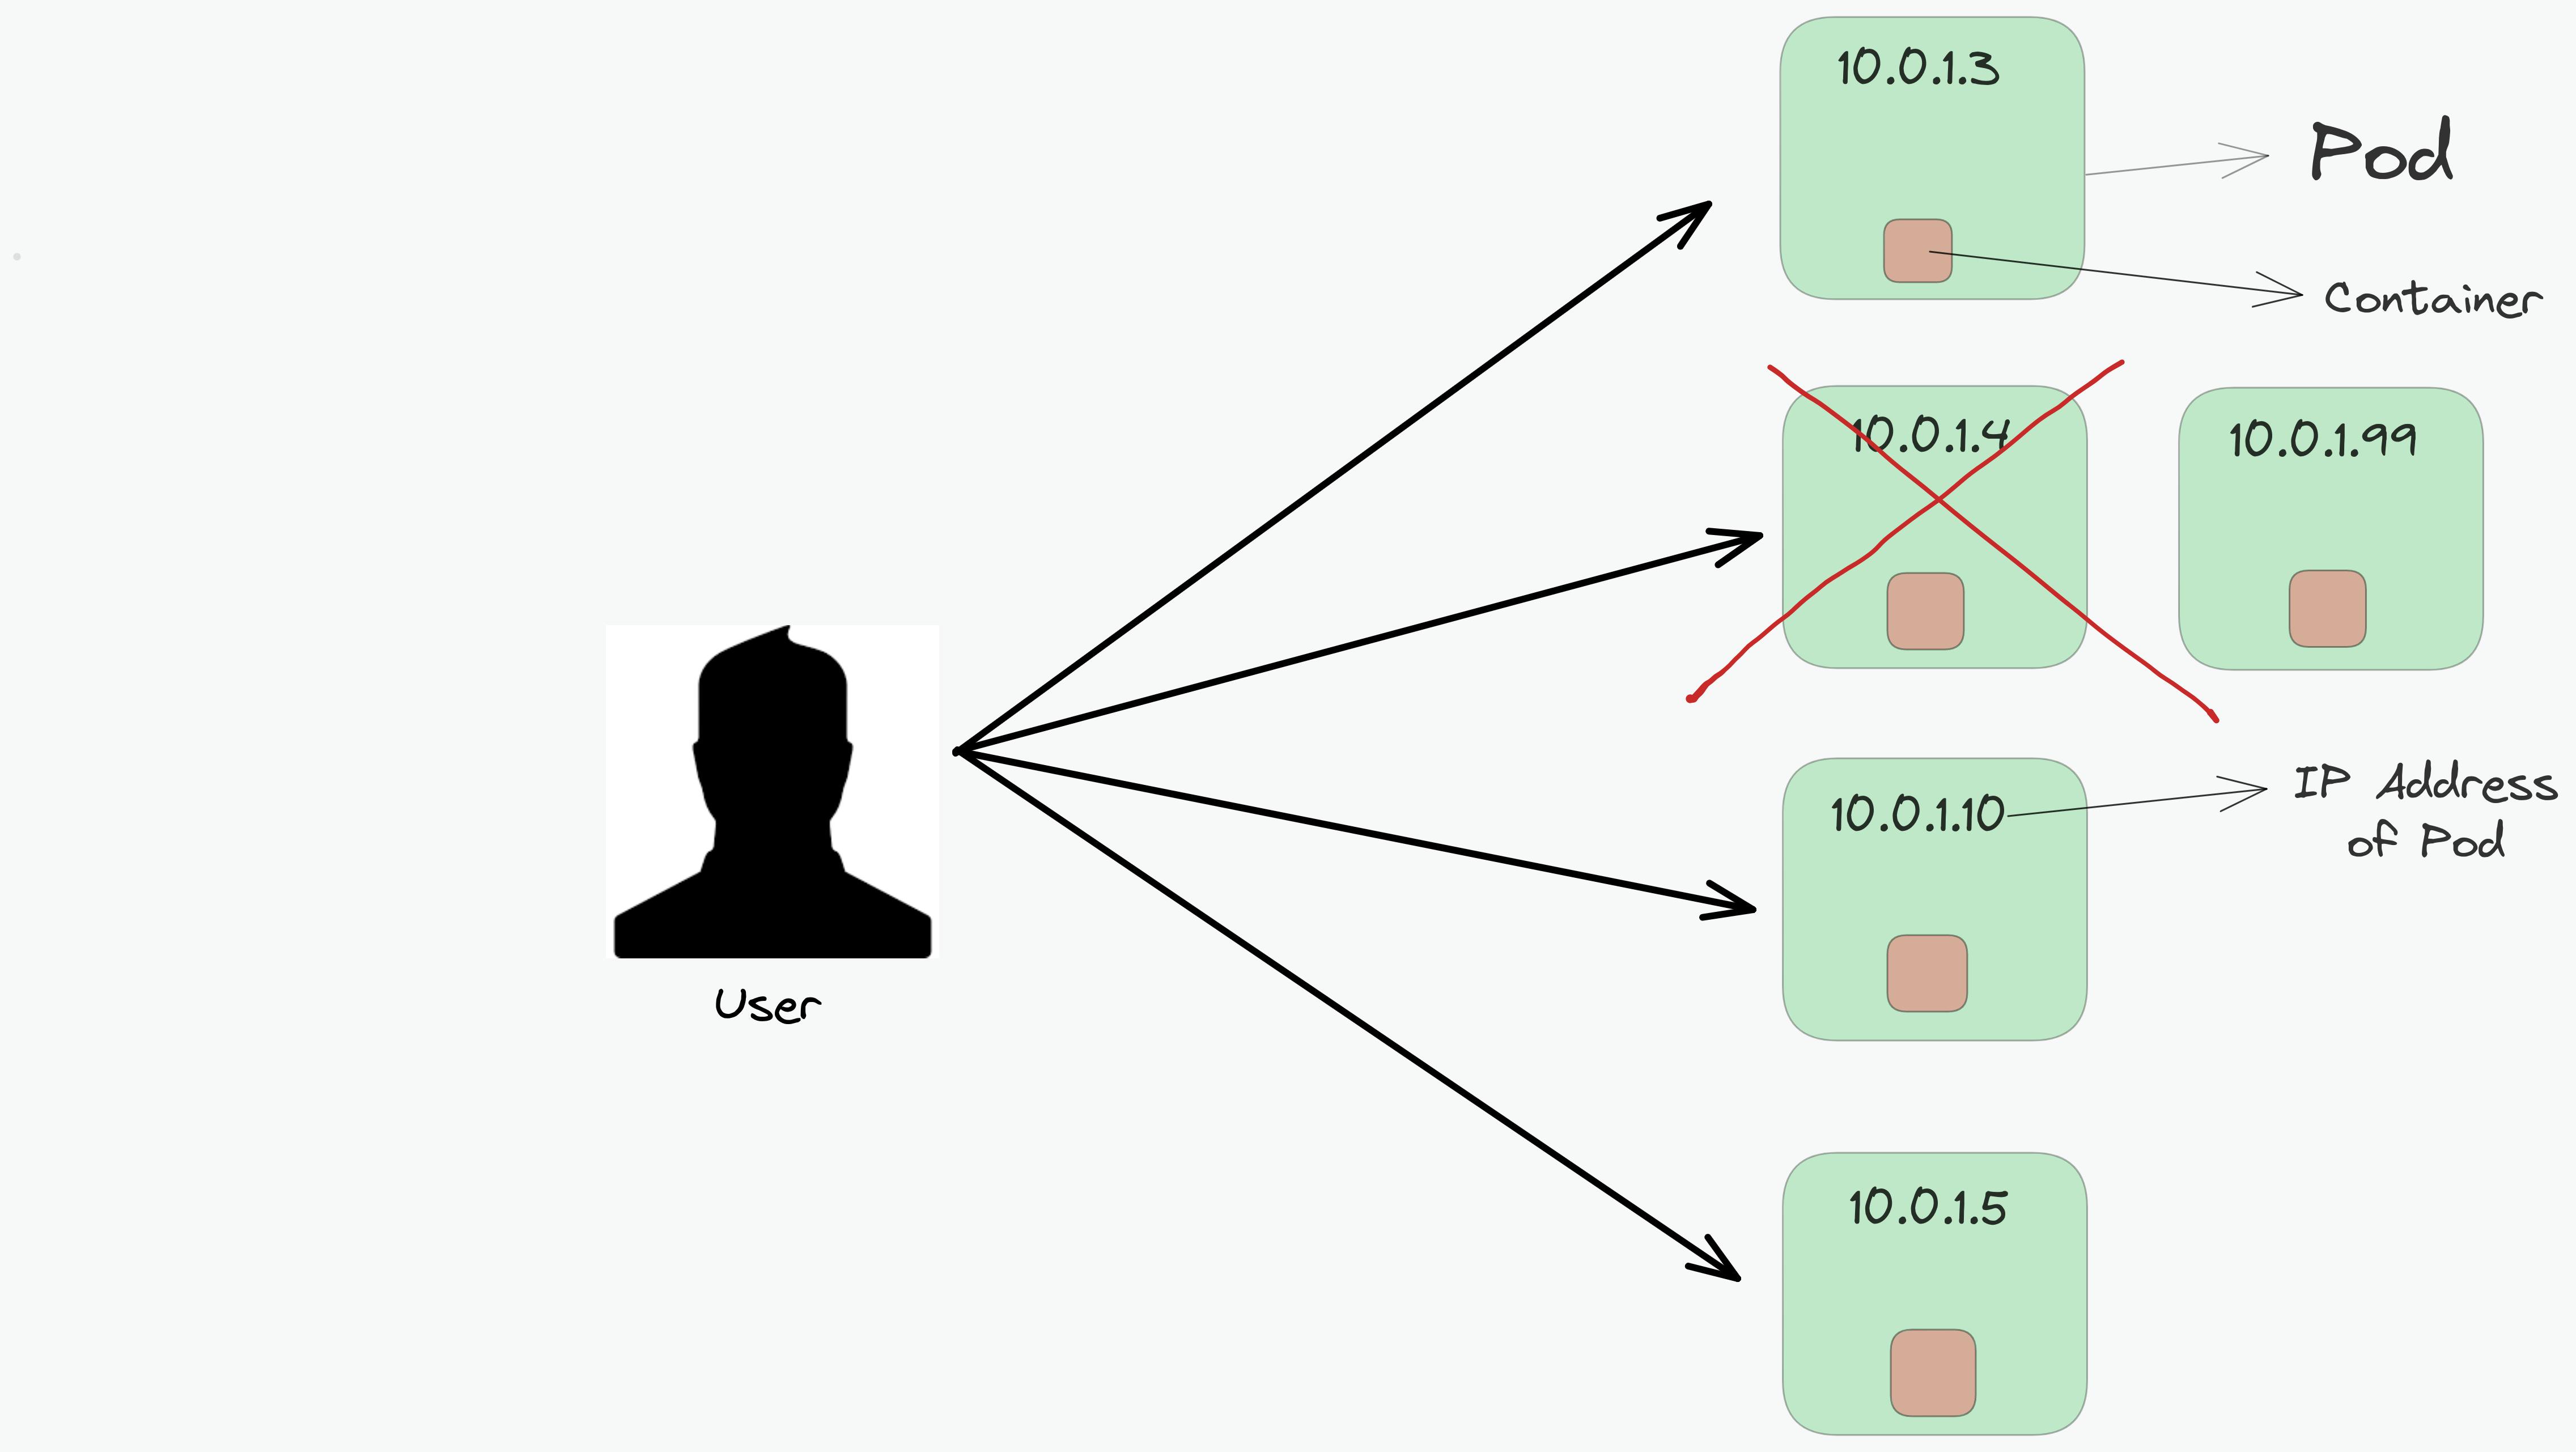
Now the user won't be able to connect with one of the Pods and will be short of accessing one microservice running inside that Pod.
Hence this is the reason why Pods are not assigned a static IP address.
In order to solve this problem, Kubernetes provides a higher-level abstraction, called Services which logically groups Pods based on the labels assigned to them with the help of Selectors.
Labels refer to the key-value pair format that is used to logically group the pods.
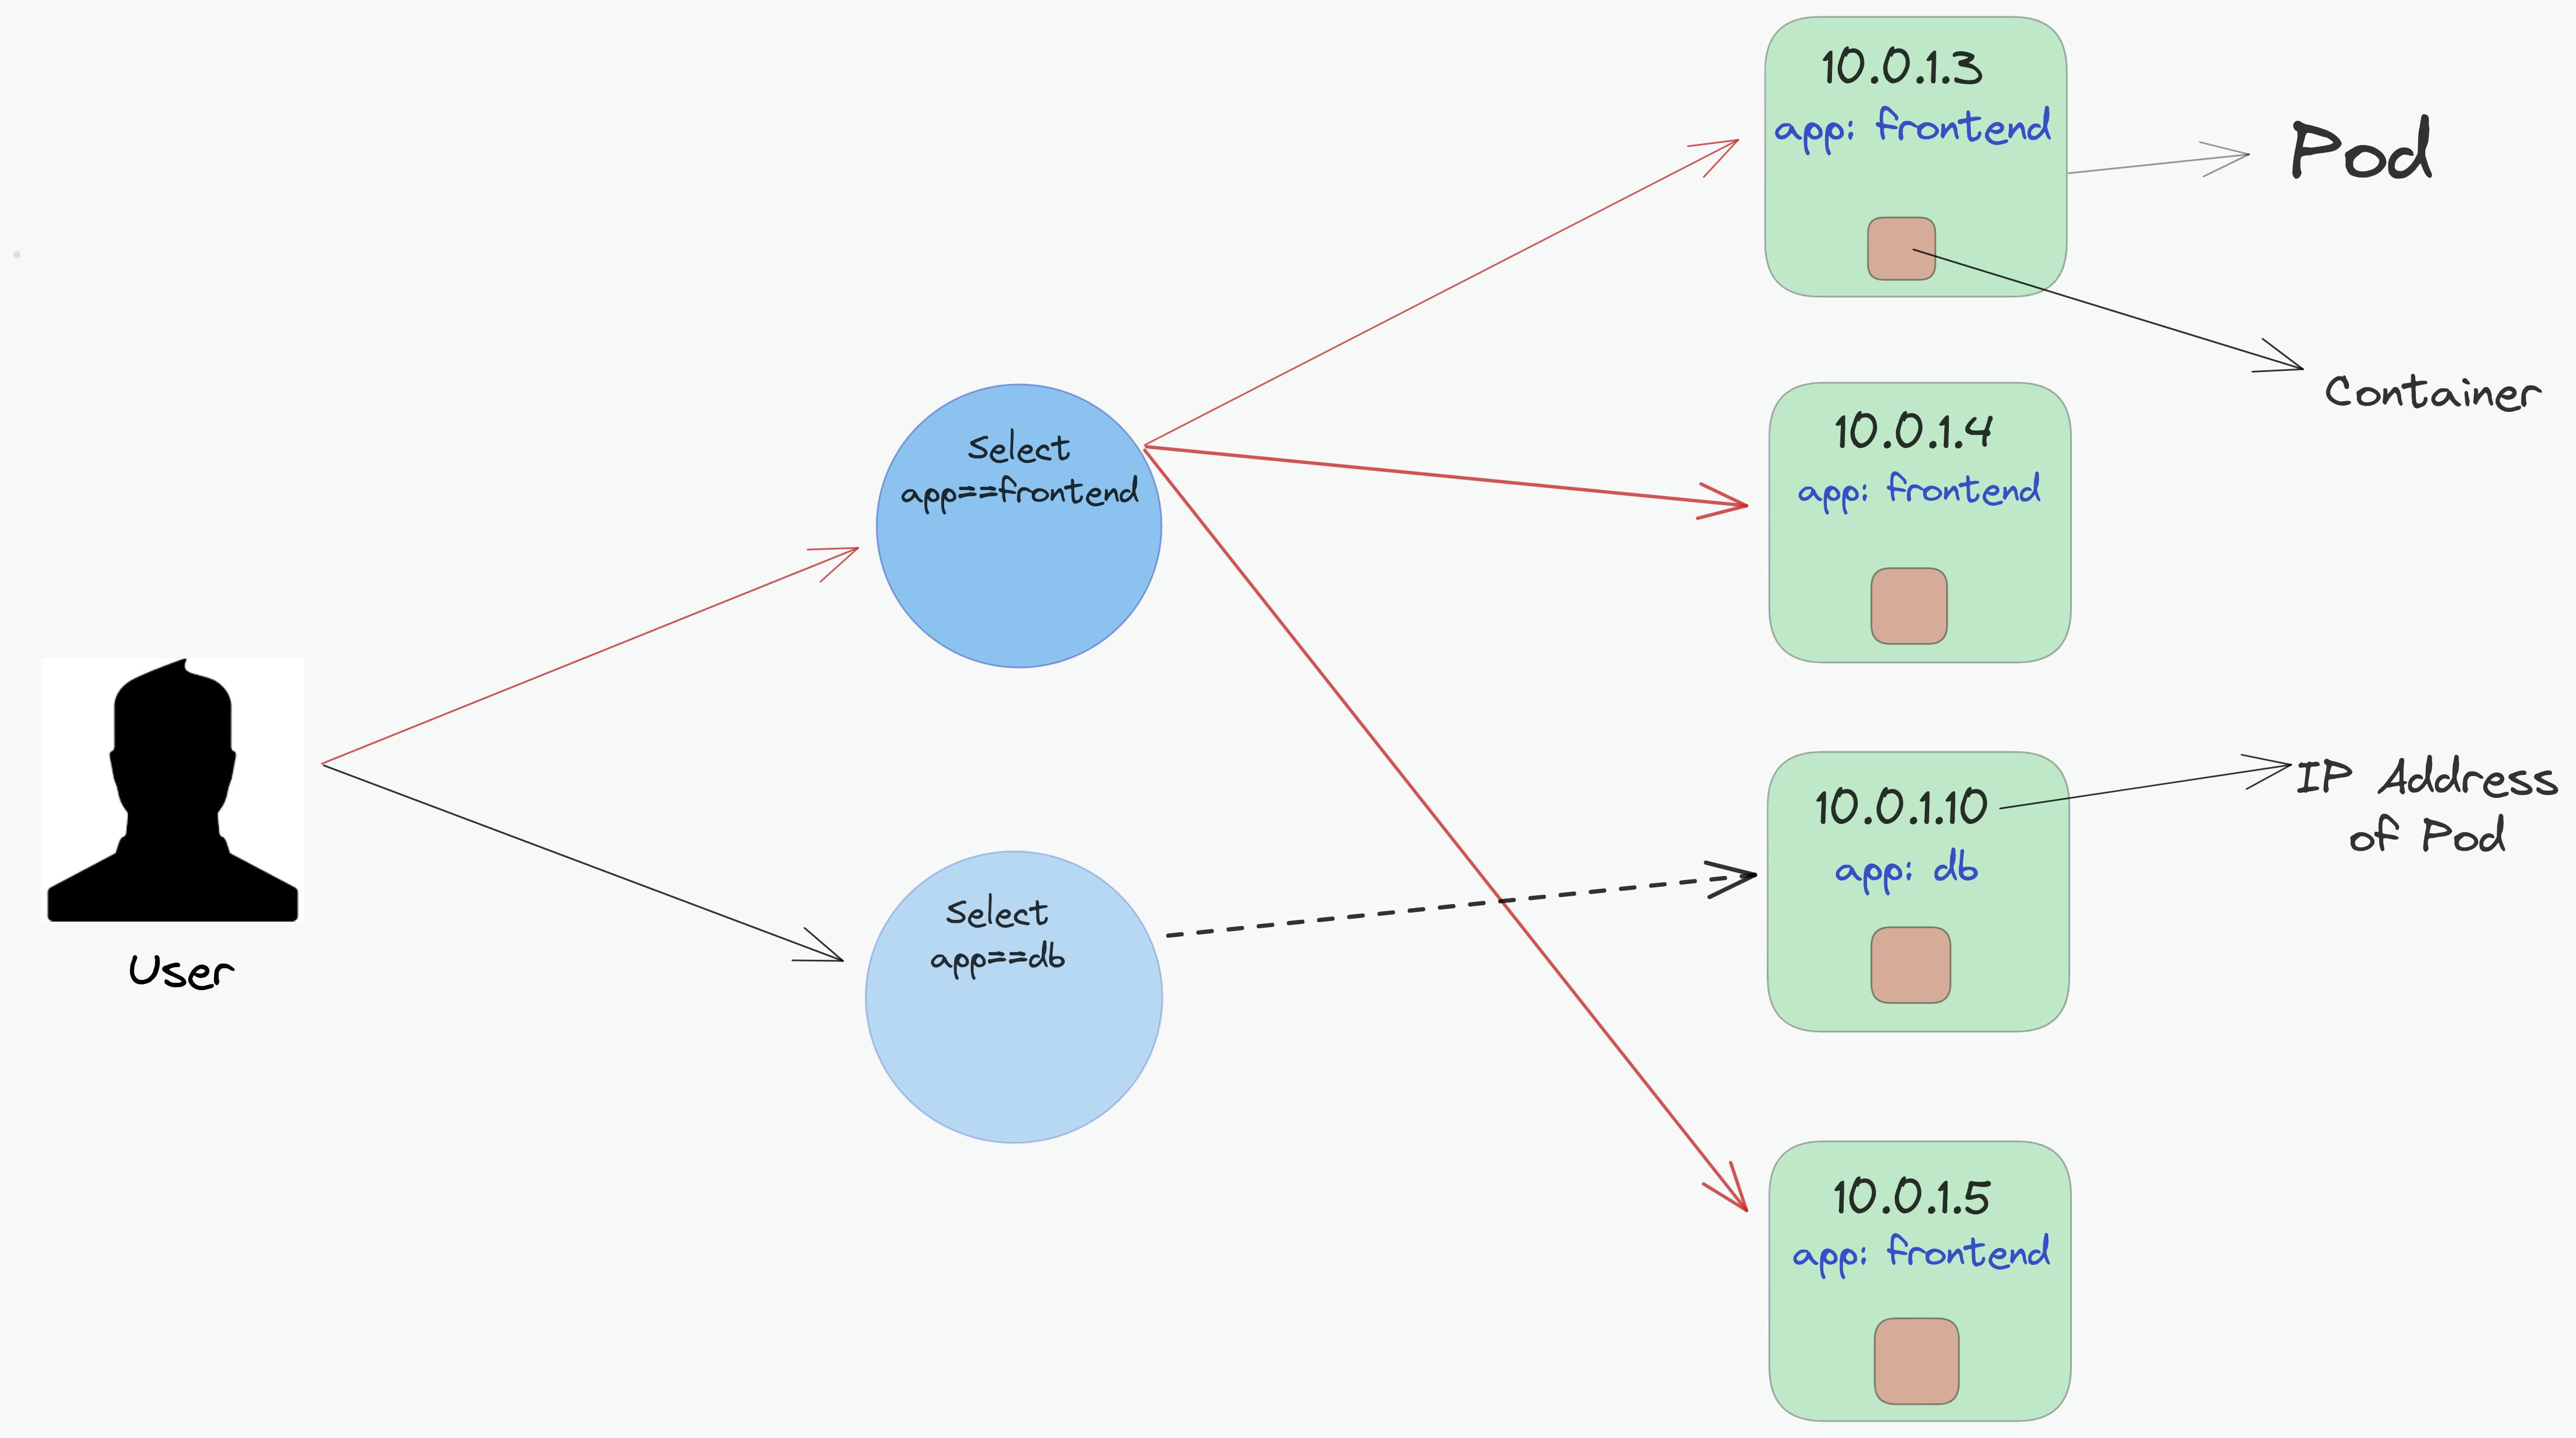
In the above representation, we group Pods into two logical sets - one set with 3 Pods and one set with a single Pod. This logical grouping of Pods is referred to as Service. Service leads to the generation of selectors. Hence in the above image, we've created two services - let's call frontend-svc & db-svc which have the selectors app==frontend & app==db, grouping the Pods with the specific labels.
Hence instead of connecting with a Pod directly, a user will now connect with a service, that will forward the request to a specific Pod required.
Let's take a look at how the configuration file of the service will look like
apiVersion: v1
kind: Service  # type of object
metadata:
  name: frontend-svc   # name of the service
spec:
  selector:
    app: frontend   # label that is used by the selector
  ports:
  - protocol: TCP   # which protocol is being used
    port: 80        # refers to the service port
    targetPort: 5000   # refers to the pod port
Here's a brief understanding of the above yaml file:
The name of the service is frontend-svc which groups the pod based on the label such that key=app & value=frontend. Port refers to the service port where a request by the user is hit. Once the request by the user is received on the service port i.e. 80, the request is transferred to the Pod port that is meant to receive the traffic from the service.
But what about the IP address of a service? How do you connect with the service itself?
You need the IP address of the service in order to send the request. The IP address of the service is called ClusterIP which is only accessible within the cluster. In short, if you would like to connect with the service, you'll have to ssh inside the cluster because the IP address of the service (ClusterIP) can only be accessed from within the cluster.
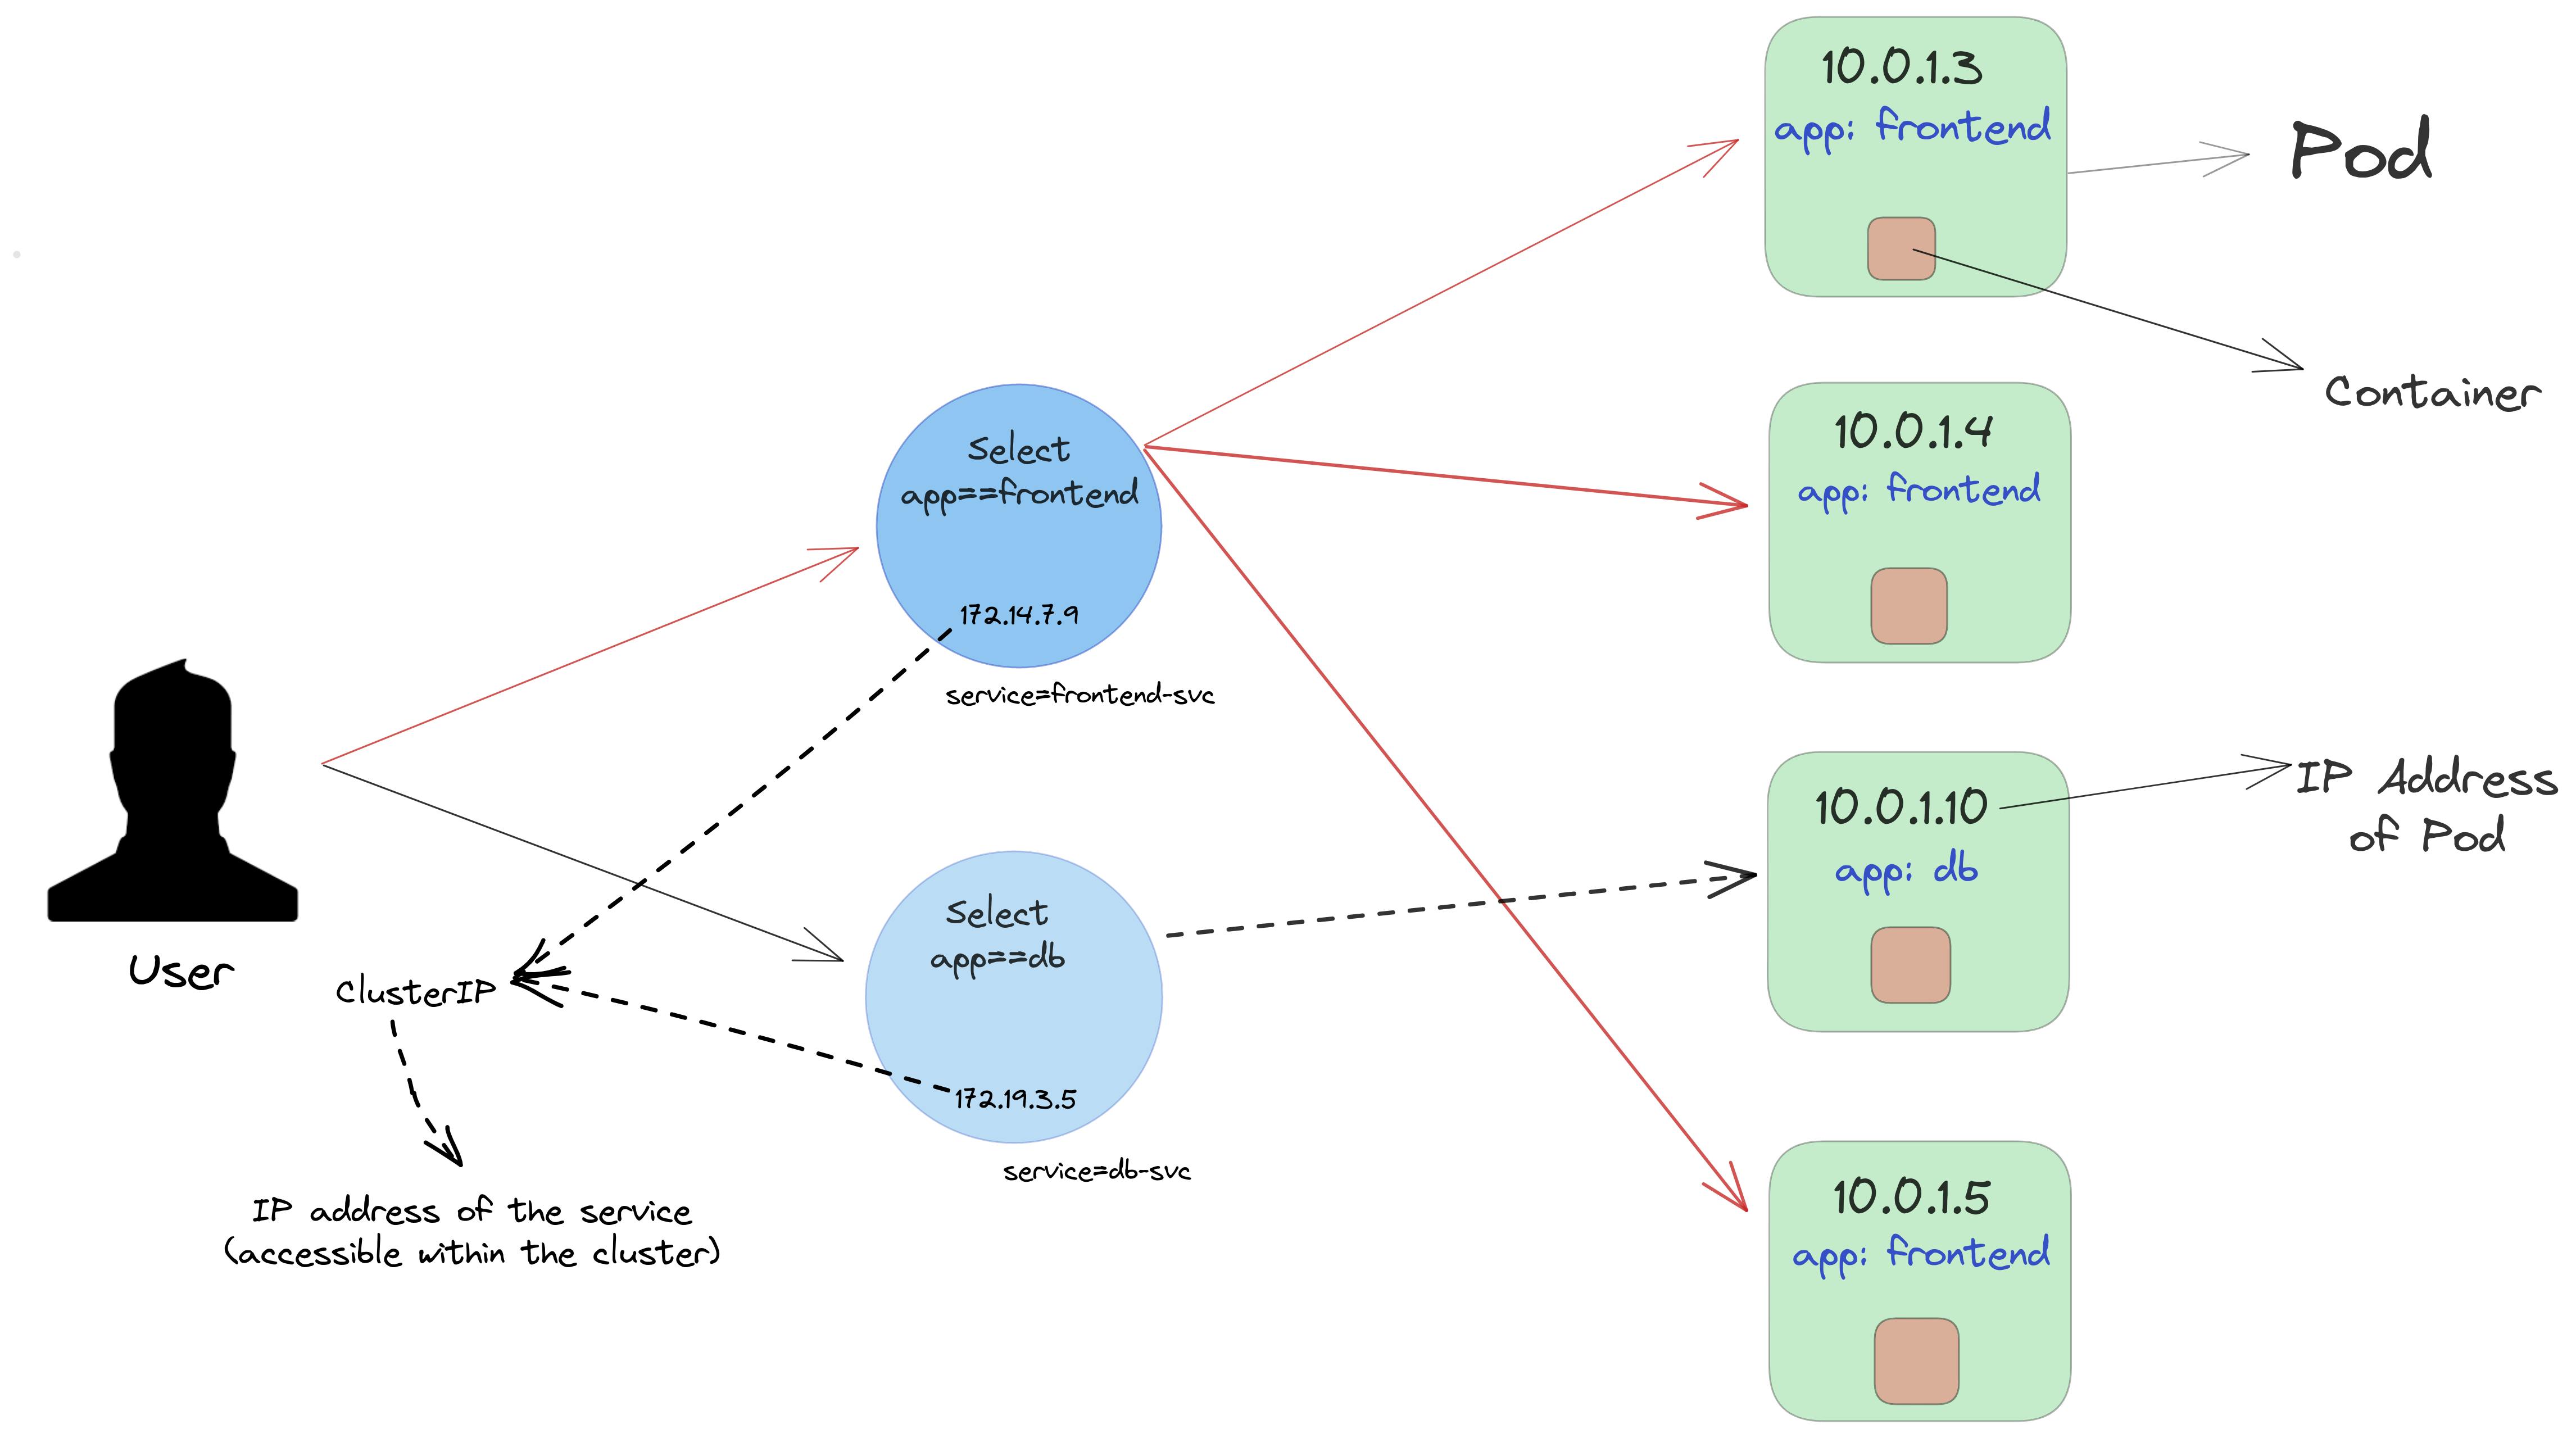
Hence, now a user connects with the service via ClusterIP. The request by the user is received on port 80 within the service. Service also acts as a Load balancer and forwards the traffic to the targetPort within the Pod. It is important to make sure that targetPort should match the containerPort of the spec section of the Pod.
At this point, you might have got confused about a variety of questions like what's the difference between containerPort and tagetPort, why should containerPort match with targetPort, and how to access the ClusterIP? Don't worry, here's an appropriate answer to these questions.
What's the difference between containerPort and targetPort?
- containerPort refers to the port within the container on which the application is running whereas targetPort is the port within the pod that handles requests from the services.
Why should containerPort match with targetPort?
- If the containerPort doesn't match with the targetPort, the pod will not be able to know to which container the request should be passed. This is because the service uses the targetPort to determine which pods to forward traffic to, and only those pods that have a containerPort that matches the targetPort will receive traffic. Hence, it's important to ensure that the targetPort and containerPort match in order for the service to function correctly.
How do you access the ClusterIP?
- The answer is simple. You need to go inside the cluster in order to access the ClusterIP. You can ssh inside the Node or a container that leads you within the cluster.
A logical set of Pod's IP address and targetPort is called a Service endpoint. Assume the targetPort is 8080, hence the frontend-svc Service has 3 endpoints: 10.0.1.3:8080, 10.0.1.4:8080, 10.0.1.6:8080 whereas db-svc Service has a single endpoint: 10.0.1.10:8080. The request by a Service is forwarded to one of the Service's endpoints.
It's the responsibility of a developer or administrator to define the configuration of a service and create it. Ever wondered which component of the Kubernetes Architecture internally creates a cluster? Think of it.
It's the kube-proxy that looks at the API server on the control plane to update, remove, and add services and endpoints. kube-proxy also works to configure the iptables rules in order to receive the traffic on ClusterIp and forward it to one of the Service's endpoints.
It is important to discover a service that has been created during runtime. Hence Kubernetes provides two ways in order to discover services during the runtime.
Environmental Variables:
As soon as the Pod starts on a Node, the kubelet running on that worker Node adds a set of environment variables in the Pod for all active services.
For eg. If you create a service called a demo-svc Service with ClusterIP 172.12.12.10 and port 8787, then a newly created Pod will contain a set of environmental variables defined by the demo-svc Service.

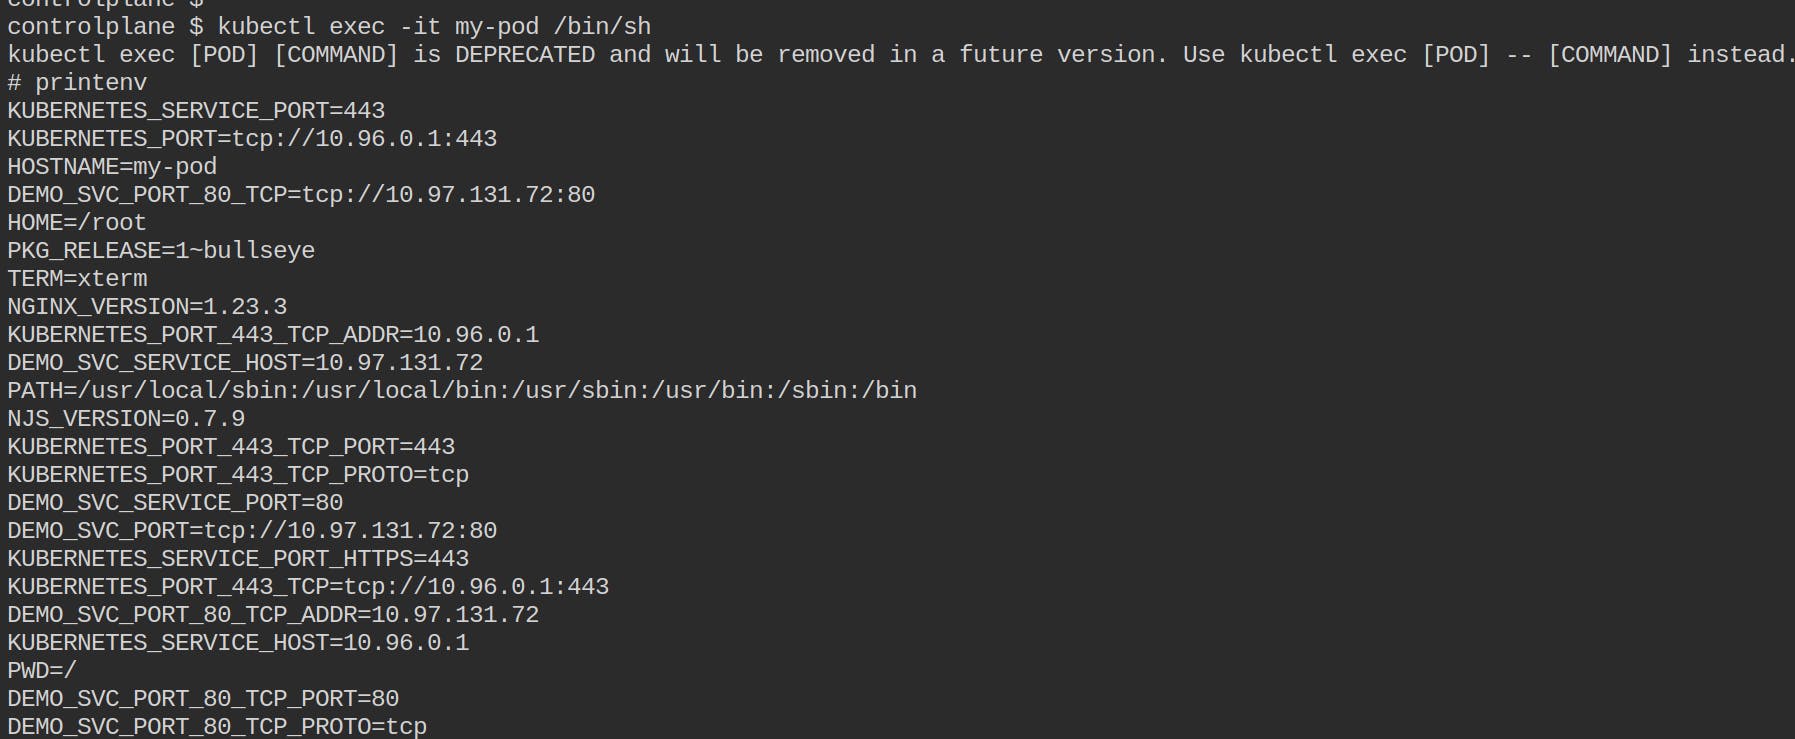
As soon as the Pod was created, the service that was defined set its environmental variables within the Pod which can be accessed by ssh inside the pod. Containers within the same pod share the same environmental variables. In order to ssh inside the Pod, you can use the following command
kubectl exec -it <pod-name> <shell-path>. The environmental variable for a pod will not be visible inside some other pod that has been created after the creation of a previous pod.Domain Name System (DNS):
Services in Kubernetes receive a DNS name with the format
Service-name.namespace.svc.cluster.local. Here,namespacerefers to the namespace in which the pod has been created. For eg. thedemo-svcService will have the DNS name asdemo-svc.default.svc.cluster.local. In order to view the DNS for the service, use the following command within the Pod.apt update && apt-get -y install dnsutils nslookup demo-svc
- Services within the same Namespace find other Services just by their names. Since
demo-svcService has been created in the default namespace, all the pods within the default namespace will look up at thedemo-svcService just by its name i.e.demo-svc. Pods within other namespaces (let's call asmy-namespace) will look at the Service that is present in some other namespace by adding a suffix of the namespace. For eg. Pods within the namespacemy-namespacewill look at thedemo-svcService asdemo-svc.defaultordemo-svc.default.svc.cluster.local.
Let's now look at various ways that you can use to access any Service. You're already familiar with one of the ways to access the Service which is by accessing the service within the cluster. What if you'd like to access your service from outside the cluster?
The access scope of the service is defined by the property called as ServiceType.
Let's look at the way to connect with the Service externally. The ServiceType used is called as NodePort.
With the NodePort Service type, along with ClusterIP, a dynamic port within the range 30000-32767, is mapped to the respective Service, from all the worker nodes. For example, if the mapped NodePort is 30222 for the demo-svc Service, then if you connect with any worker node on the port 30222 , the node would redirect all the traffic to the assigned ClusterIP.
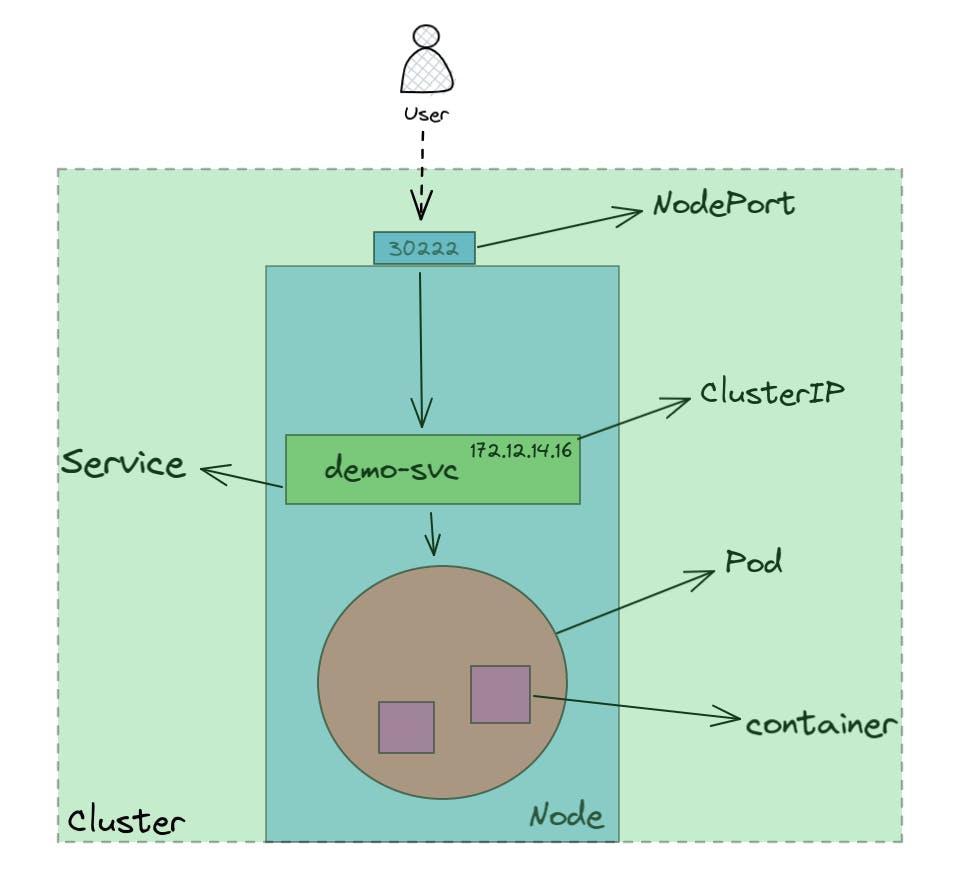
Now, let's take a hands-on demo to understand the Services in a better way.
DEMO-TIME:
Run a pod with any name you'd like to give and create a service that selects that Pod using a single command. This command will create and run the pod along with the creation of the service with the same name as the pod name.
kubectl run my-pod --image=nginx --port=80 --expose=true
List down the details of the pods, Service ad endpoints along with the labels using the command:
kubectl get po,svc,ep --show-labels
You can notice that there's one pod with the name my-pod and three Services. If you look carefully at the third Service, you'll find that this Service is created for the pod my-pod with ClusterIP as
10.110.232.108and port as80. 80 is the Service port.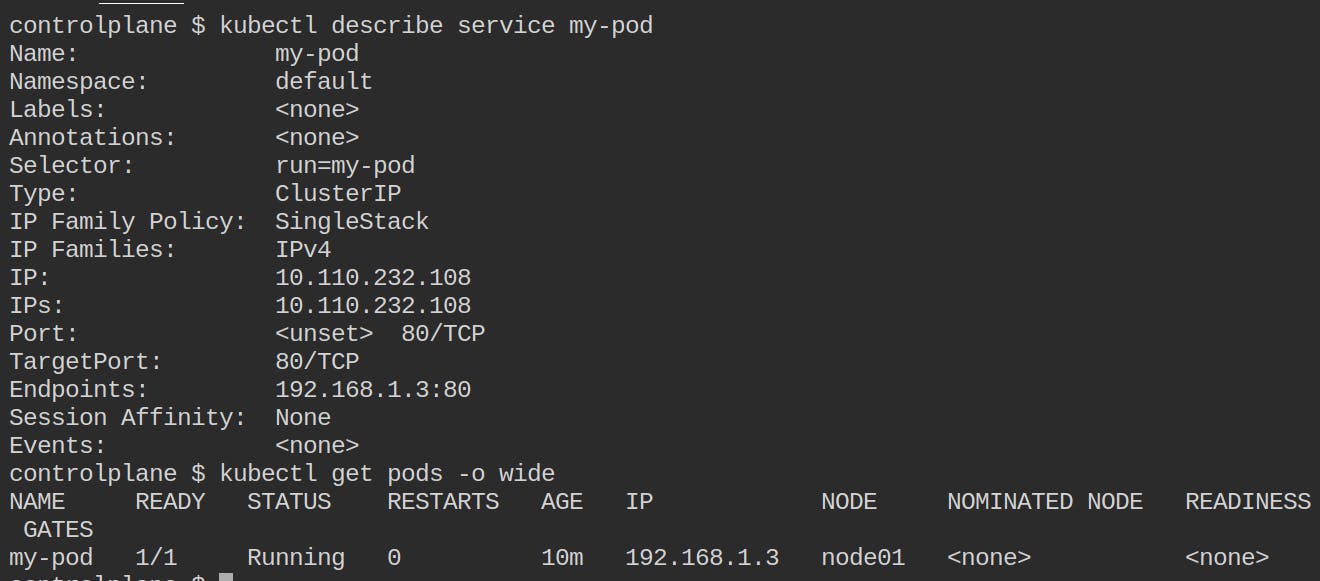
You can also look the label that the Selector is using to group the Pod. Carefully notice that the endpoint for the Service
my-podcontains the IP address of the pod which can be be validated from the commandkubectl get pods -o wide.Let's access the Service now. But how? Do we need to ssh within the Node to access the Service? Yes. Because the ServiceType used is ClusterIP (default) and not NodePort.

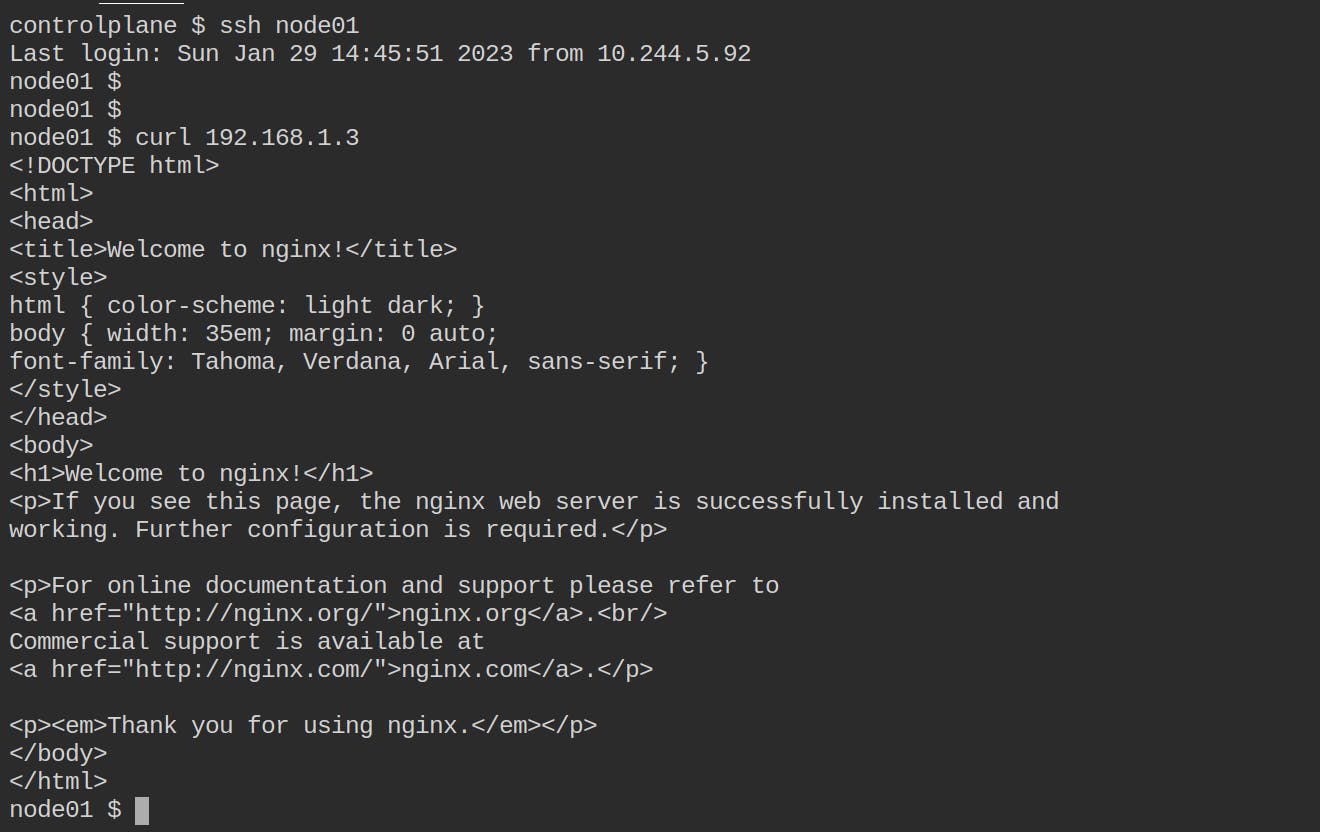
Alright! We can access the pod's IP from the Node. The output shows the HTML file that would be displayed on the browser. Ideally, the Service should also provide the same response. Let's validate it.
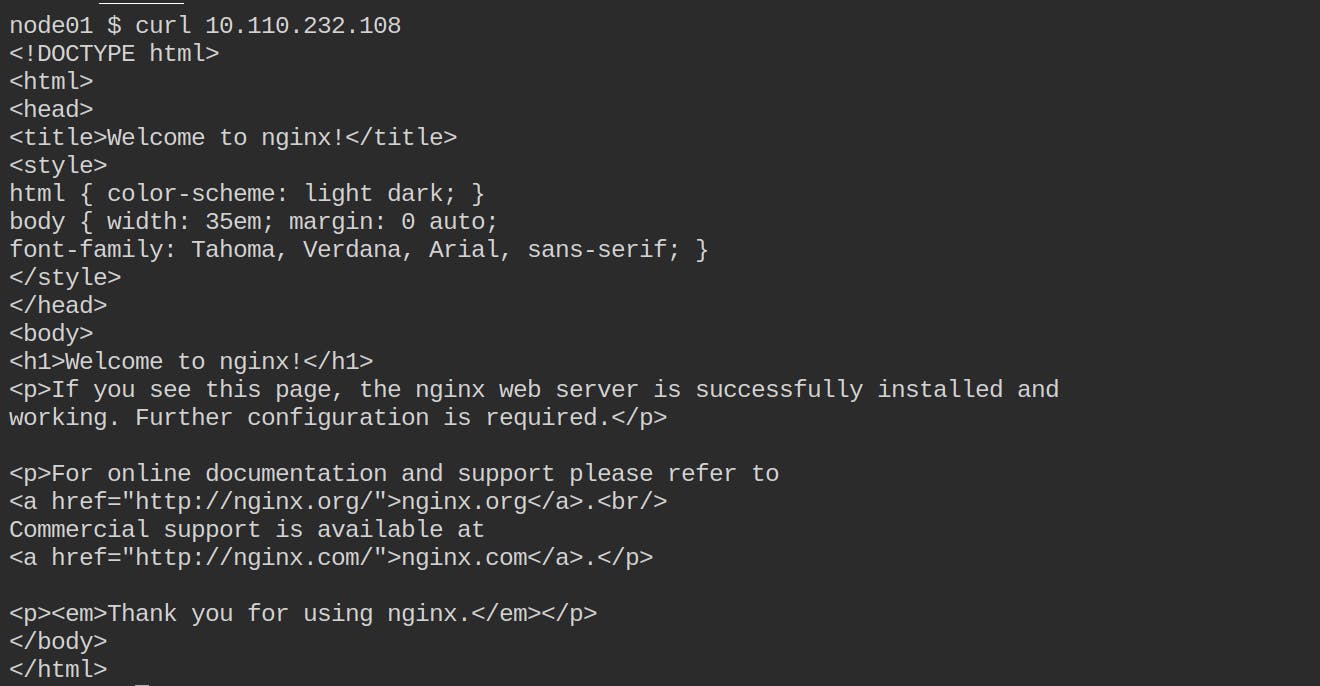
10.110.232.100is the ClusterIP whereas192.168.1.3is the pod's IP address. In the above image, you've sent a request to the Service which forwards that request to the desired pod.
Congratulations! You've accessed the Service from within the cluster.
Let's take a look at how will you access the same Service from outside the cluster. NodePort.
All we need to do is to change the ServiceType in the Service configuration file to NodePort. Kubernetes will automatically assign a NodePort within the desired range. You can edit the configuration file using the command kubectl edit svc my-pod .
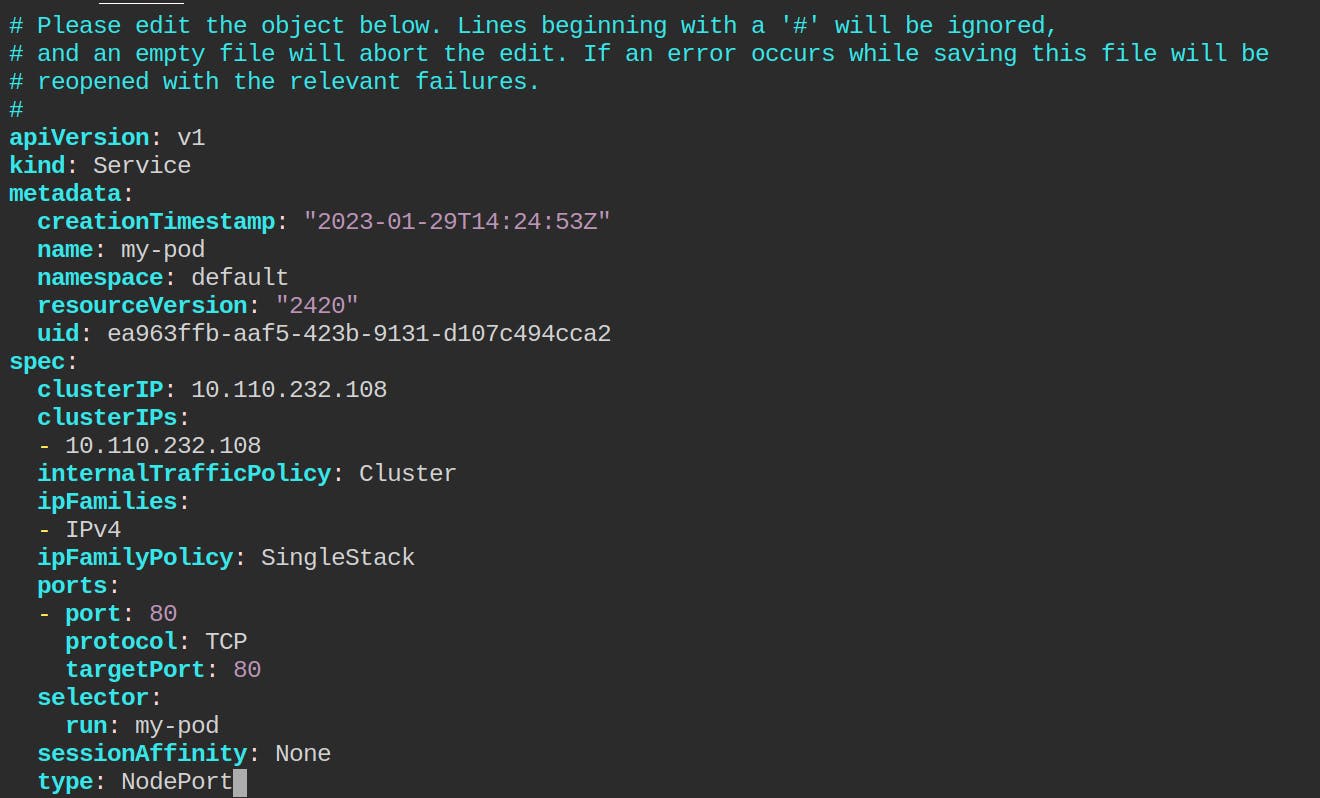
As you can see, I've changed the type to NodePort. Note that the targetPort is the same as the port here. You can modify the targetPort if you'd like to. Save and exit from it.
Let's take a look at the Service now
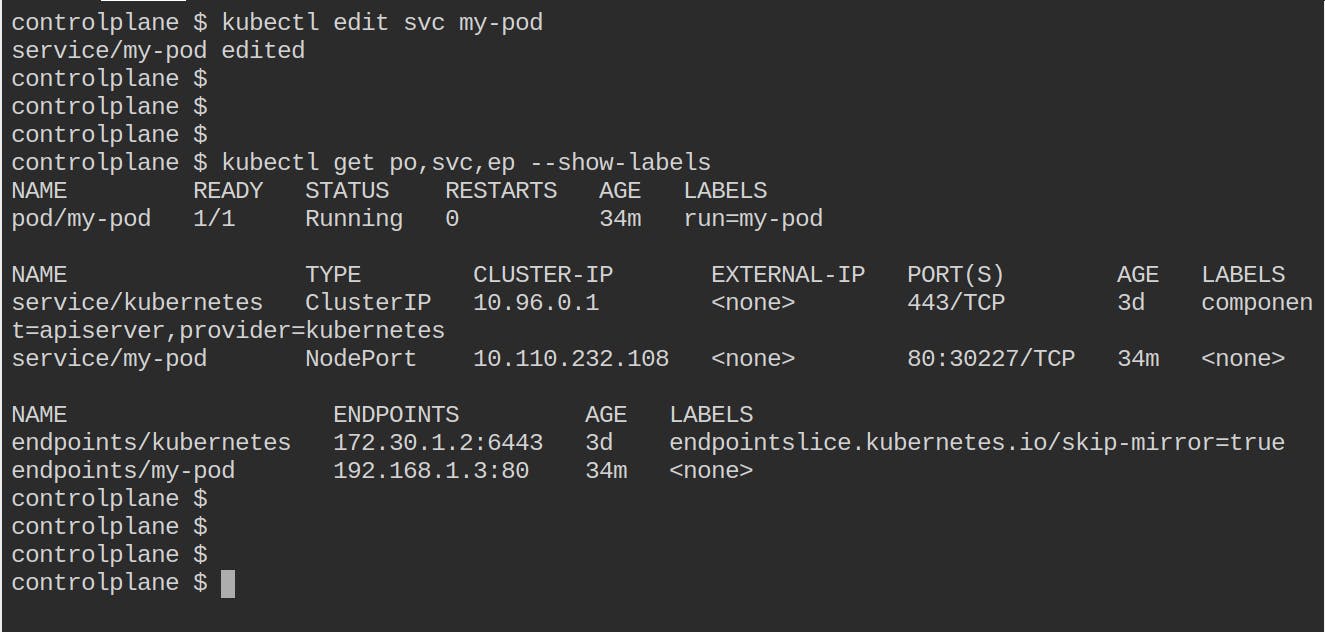
You can see that the ServiceType has been changed to NodePort with 80 as the Service Port and 30227 as the NodePort. Now you can connect with your NodePort from outside the cluster and it'll show the same HTML format as it showed while ssh in the cluster.
Since this is of type NodePort , you can send the request to the IP address of the host machine with the port number as NodePort.
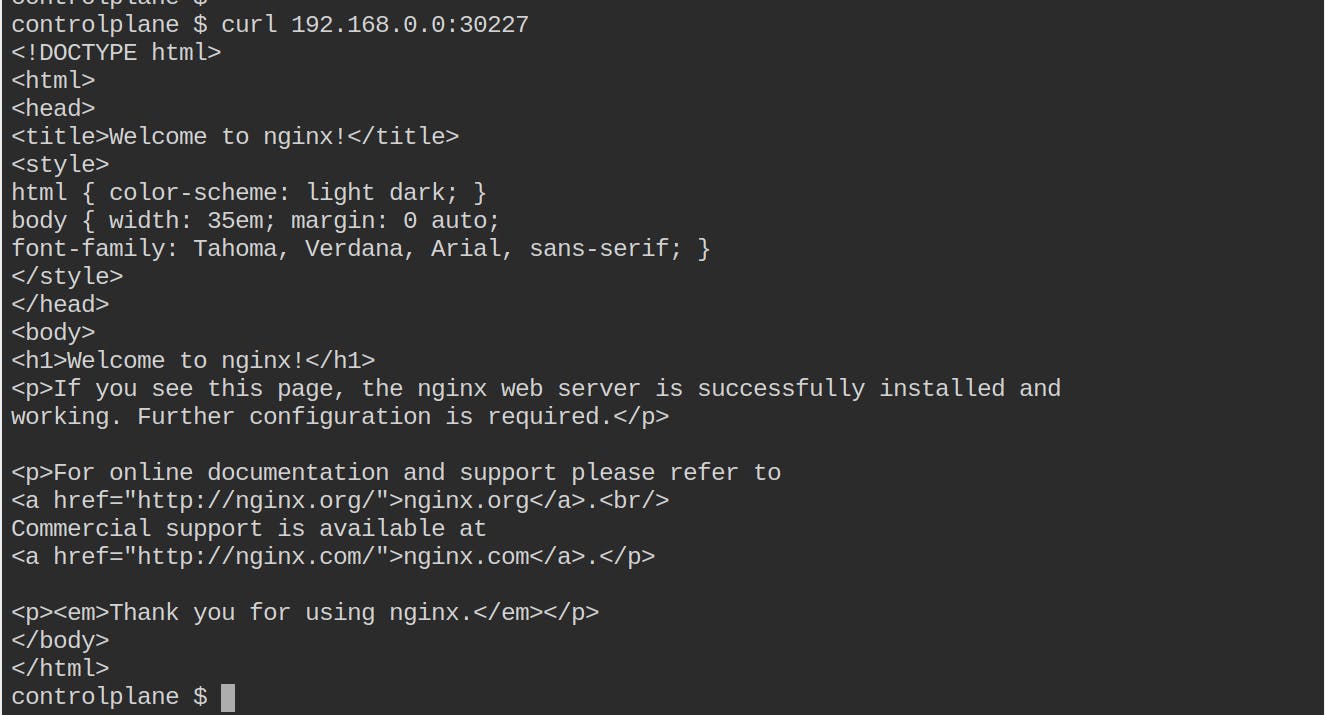
192.168.0.0is the IP address of the host machine and30227is the port number that I'm sending a request. Don't forget that NodePort is accessible from outside the cluster. The request sent to the NodePort is redirected to the IP address of the Service (on Service Port80) which is further redirected to the targetPort80. Internally, the containerPort will also be80.
Here's the diagrammatic approach for you
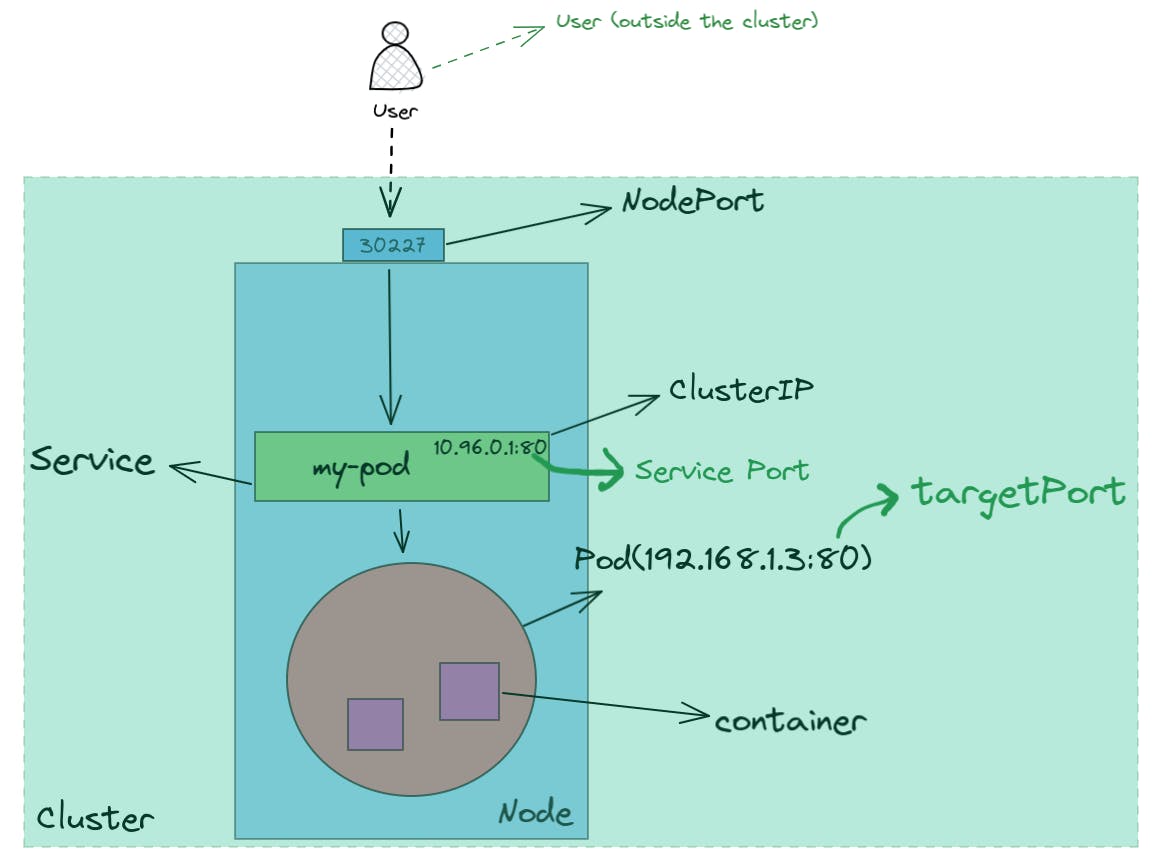
Congratulations for the second time! You've accessed the Service from outside the cluster.
Well, Services don't end here but this blog does. Without making this blog more lengthy, I'll stop writing further. However, we'll look at more Service types such as LoadBalancer and later, Ingress as well.
I hope you liked this blog.
